Learn how to integrate Warp 10 in your development process from code to production through your CI/CD tool.
Introduction
Many times, by talking with our customers, we discover common practices about the data management pipeline. The common process is to interact with the data source with a Python script on a laptop, but they feel a certain gap between the development stage and production.
So Warp 10 is a real game-changer in this process. We allow to cross this gap quite seamlessly but, of course, many people hurt by previous experiences, do not believe us. One of the most common questions we encounter is: how do we walk from WarpStudio to a CI/CD pipeline in production?
| Discover WarpStudio, a Web IDE dedicated to Warp 10 |
The integration process is really, really easy with Warp 10. It relies on a couple of tools provided in standard:
- An IDE (WarpStudio or VSCode)
- WarpFleet Resolver
- WarpFleet Synchronizer
- A CI/CD tool (Jenkins, GitHub Actions, GitLab CI, and so on)
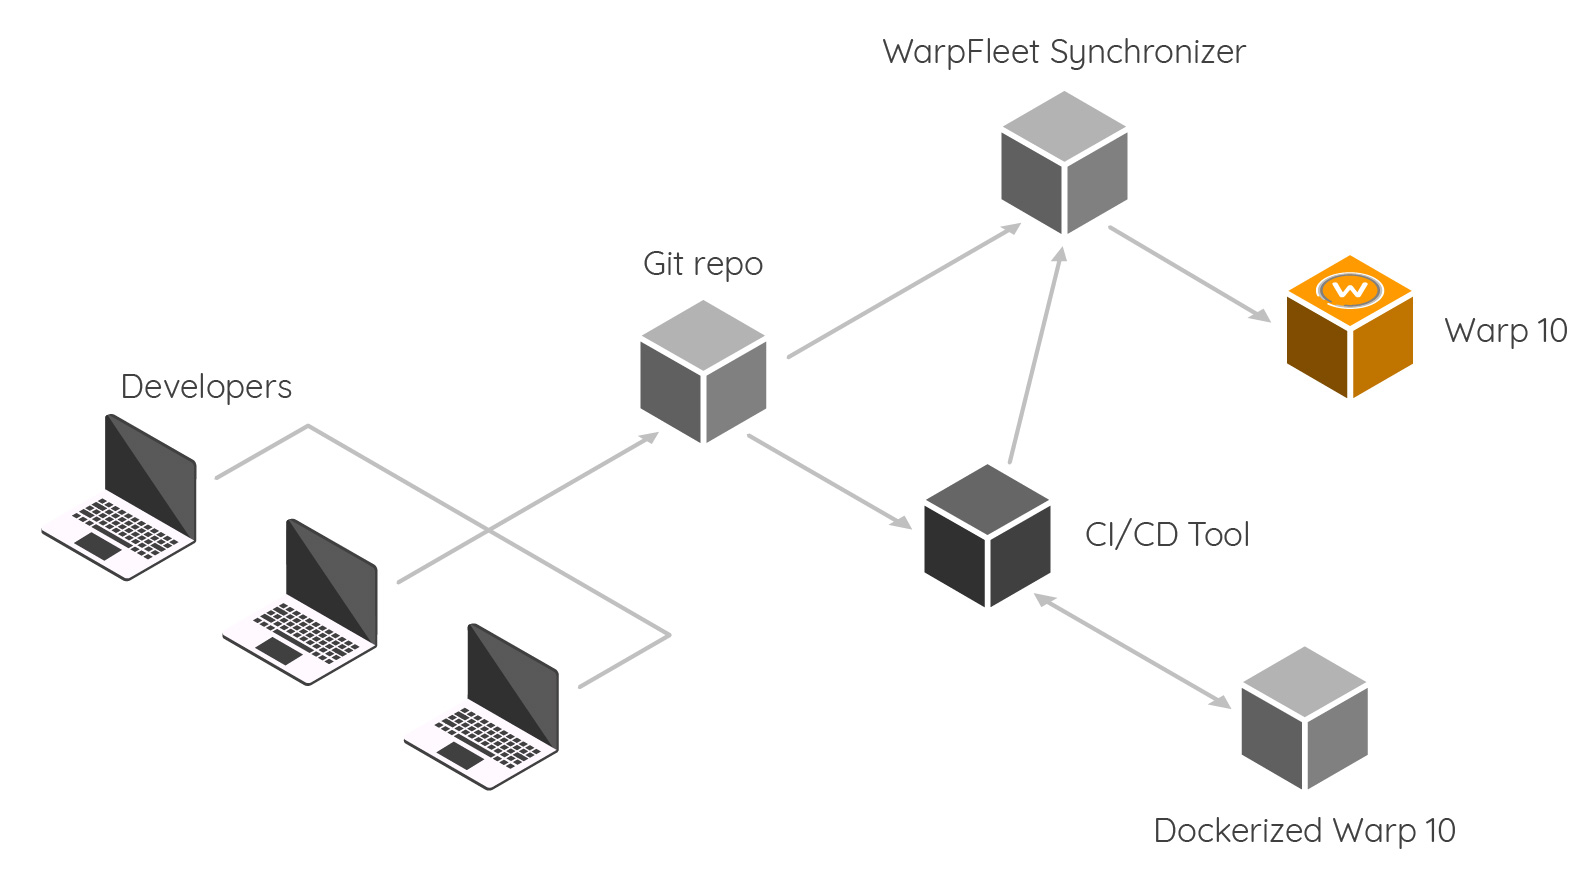
Here is the main picture of the process:
Development
Each developer can use VSCode with our plugin. They will not develop a huge piece of WarpScript/FLoWS but rather macros in order to factorize their code according to the separation of concerns and loose coupling concepts (like with any programming language, in fact, except SQL like ones). Through their development process, they will push their work into a Git repository. They also may code some unit tests.
This step is very similar than a common dev process. Nothing new in fact.
CI/CD
Once the code pushed to the Git repository, the CI/CD tool will treat it either periodically or triggered with a Git Push hook. This step depends on what your organization wants to do with the WarpScript/FLoWS code. Typically, the CI/CD tool will pop a Warp 10 docker image and run unit tests among it. If tests are OK (sure they will be… most of the time), your CI/CD tool will probably put a tag on it (just in case, if you want to revert to an older version) and increase the version number. And then your code is ready for production.
It is not a universal recipe. It depends on YOUR processes. You may have a qualification environment, a packaging process, and so on.
Once your code is ready for production, your CI/CD tool notifies WarpFleet Synchronizer.
WarpFleet Synchronizer
Setup
The setup is easy. You have to compile and package WarpFleetSynchronizer. At first, get the source code here: https://github.com/senx/WarpFleetSynchronizer
git clone https://github.com/senx/WarpFleetSynchronizer.git
cd WarpFleetSynchronizer
./gradlew shadowJar
Now you have to configure your first repo. Create a file conf.json:
{
    "host": "0.0.0.0",
    "port": 8082,
    "remotes": "*",
    "repos": [
        {
            "owner": "hammet",
            "name": "my-warpfleet-macros", // must be unique
            "url": "git@github.com:senx/my-warpfleet-macros.git",
            "passphrase": "sshPass"
        }
    ]
}
Run it
java -jar WarpFleetSynchronizer.jar ./path/to/conf.jsonWarpFleet Resolver
Now setup Warp 10 ( /path/to/warp10/etc/conf.d/20-warpfleet.conf )
warpfleet.macros.repos = http://<ip of warpfleet sync>/macrosNotify the WarpFleet Synchronizer
http://<ip of warpfleet sync>:8082/api/sync/my-git-repoLearn more about
Going further
Well, now you have a complete Warp 10 foundry which will embrace your development process seamlessly. You could also use Warp 10 to collect build metrics coming from your CI/CD tool and build alerts and/or dashboards with it.
Read more
Demystifying LevelDB
Introducing WarpFleet
Forecast with Facebook Prophet and CALL

Senior Software Engineer