Drawing time series with a laser on a phosphorescent plane. Funny project with a RaspberryPi, Warp 10 inside!
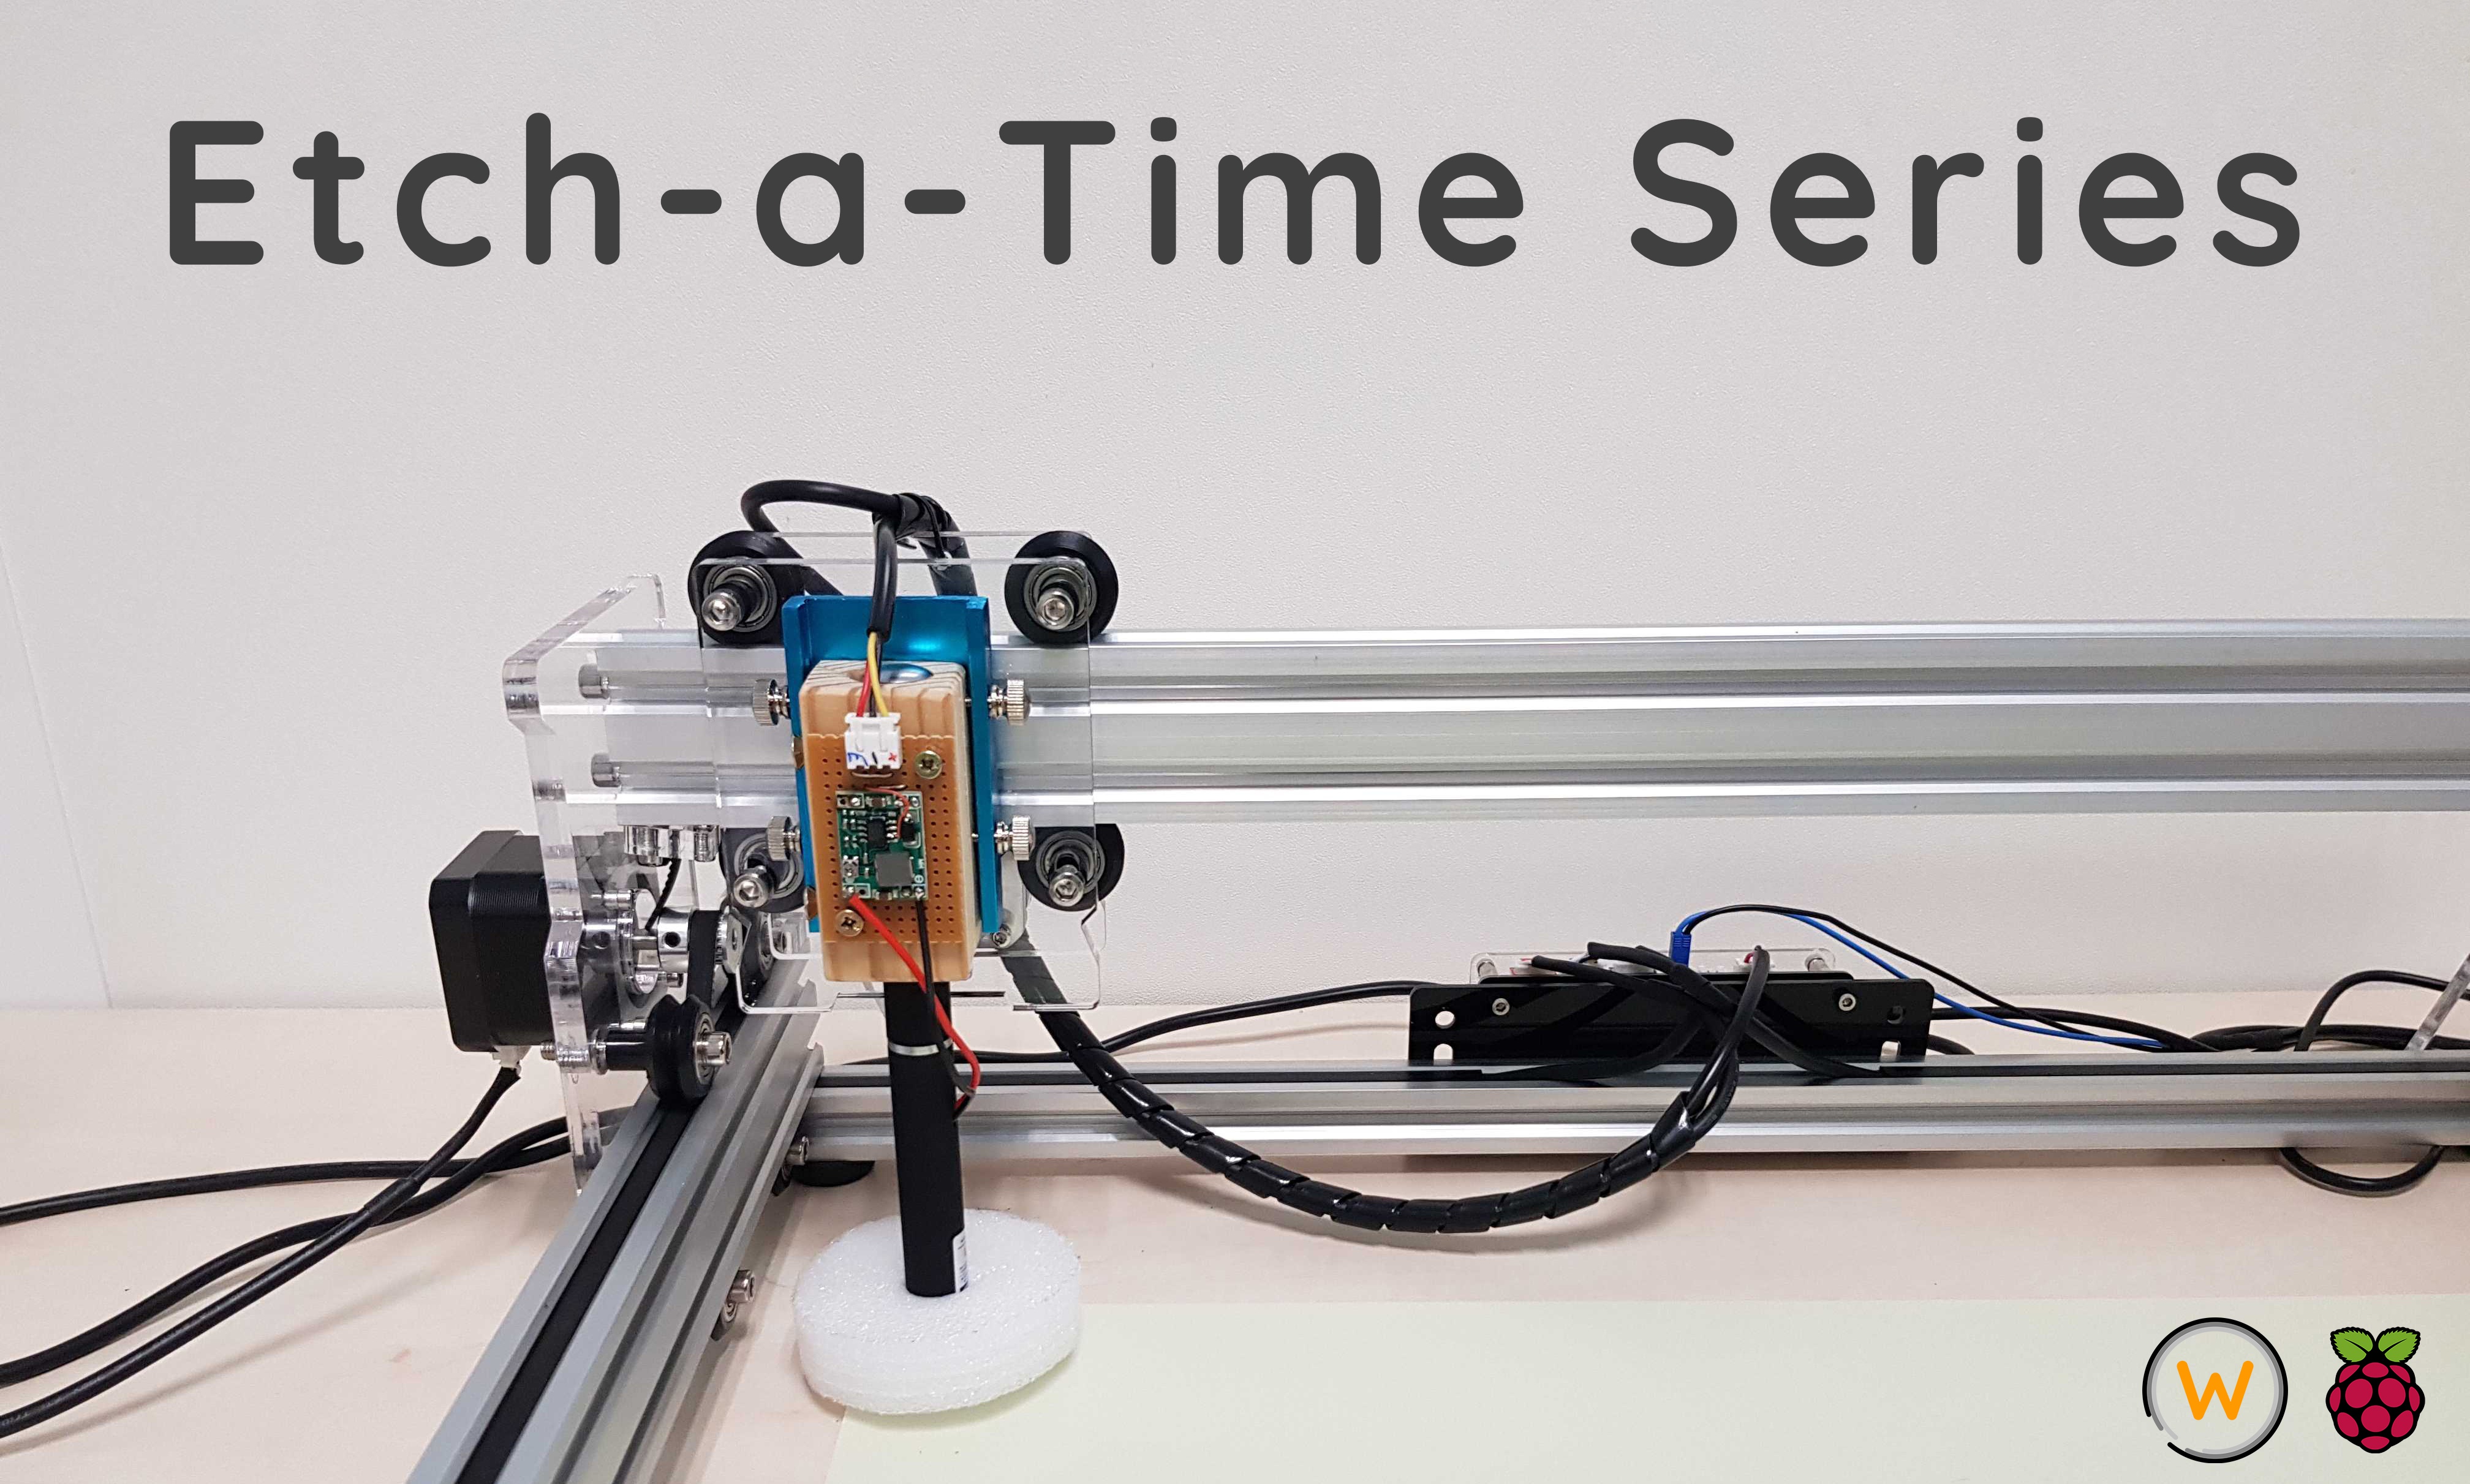
(a totally useless indispensable project)
Bill of Material:
- a GRBL controlled laser engraving machine
- a cheap blue laser pointer
- a phosphorescent sheet
- two MP1584 DC-DC Adjustable Buck module
- a Raspberry Pi 3
- a MHS 3.5 inch screen kit.
| Read more about Warp 10 Raspberry Pi 4 benchmark for industrial IoT |
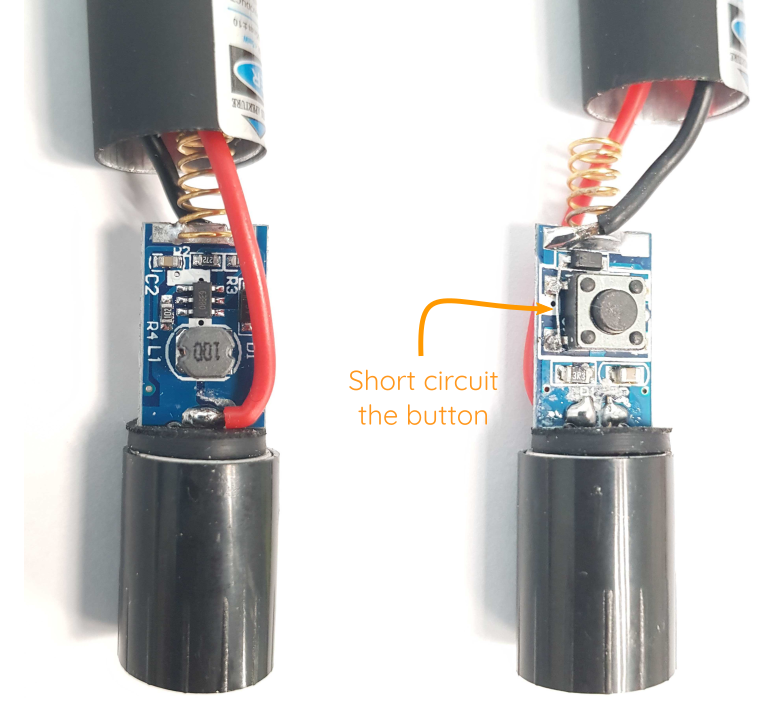
Replace the laser
First, remove the dangerous 2.5watt laser. Keep it away from children witty colleagues. Then, take apart the laser pointer, sold two wires to power it directly, and bypass the push button.
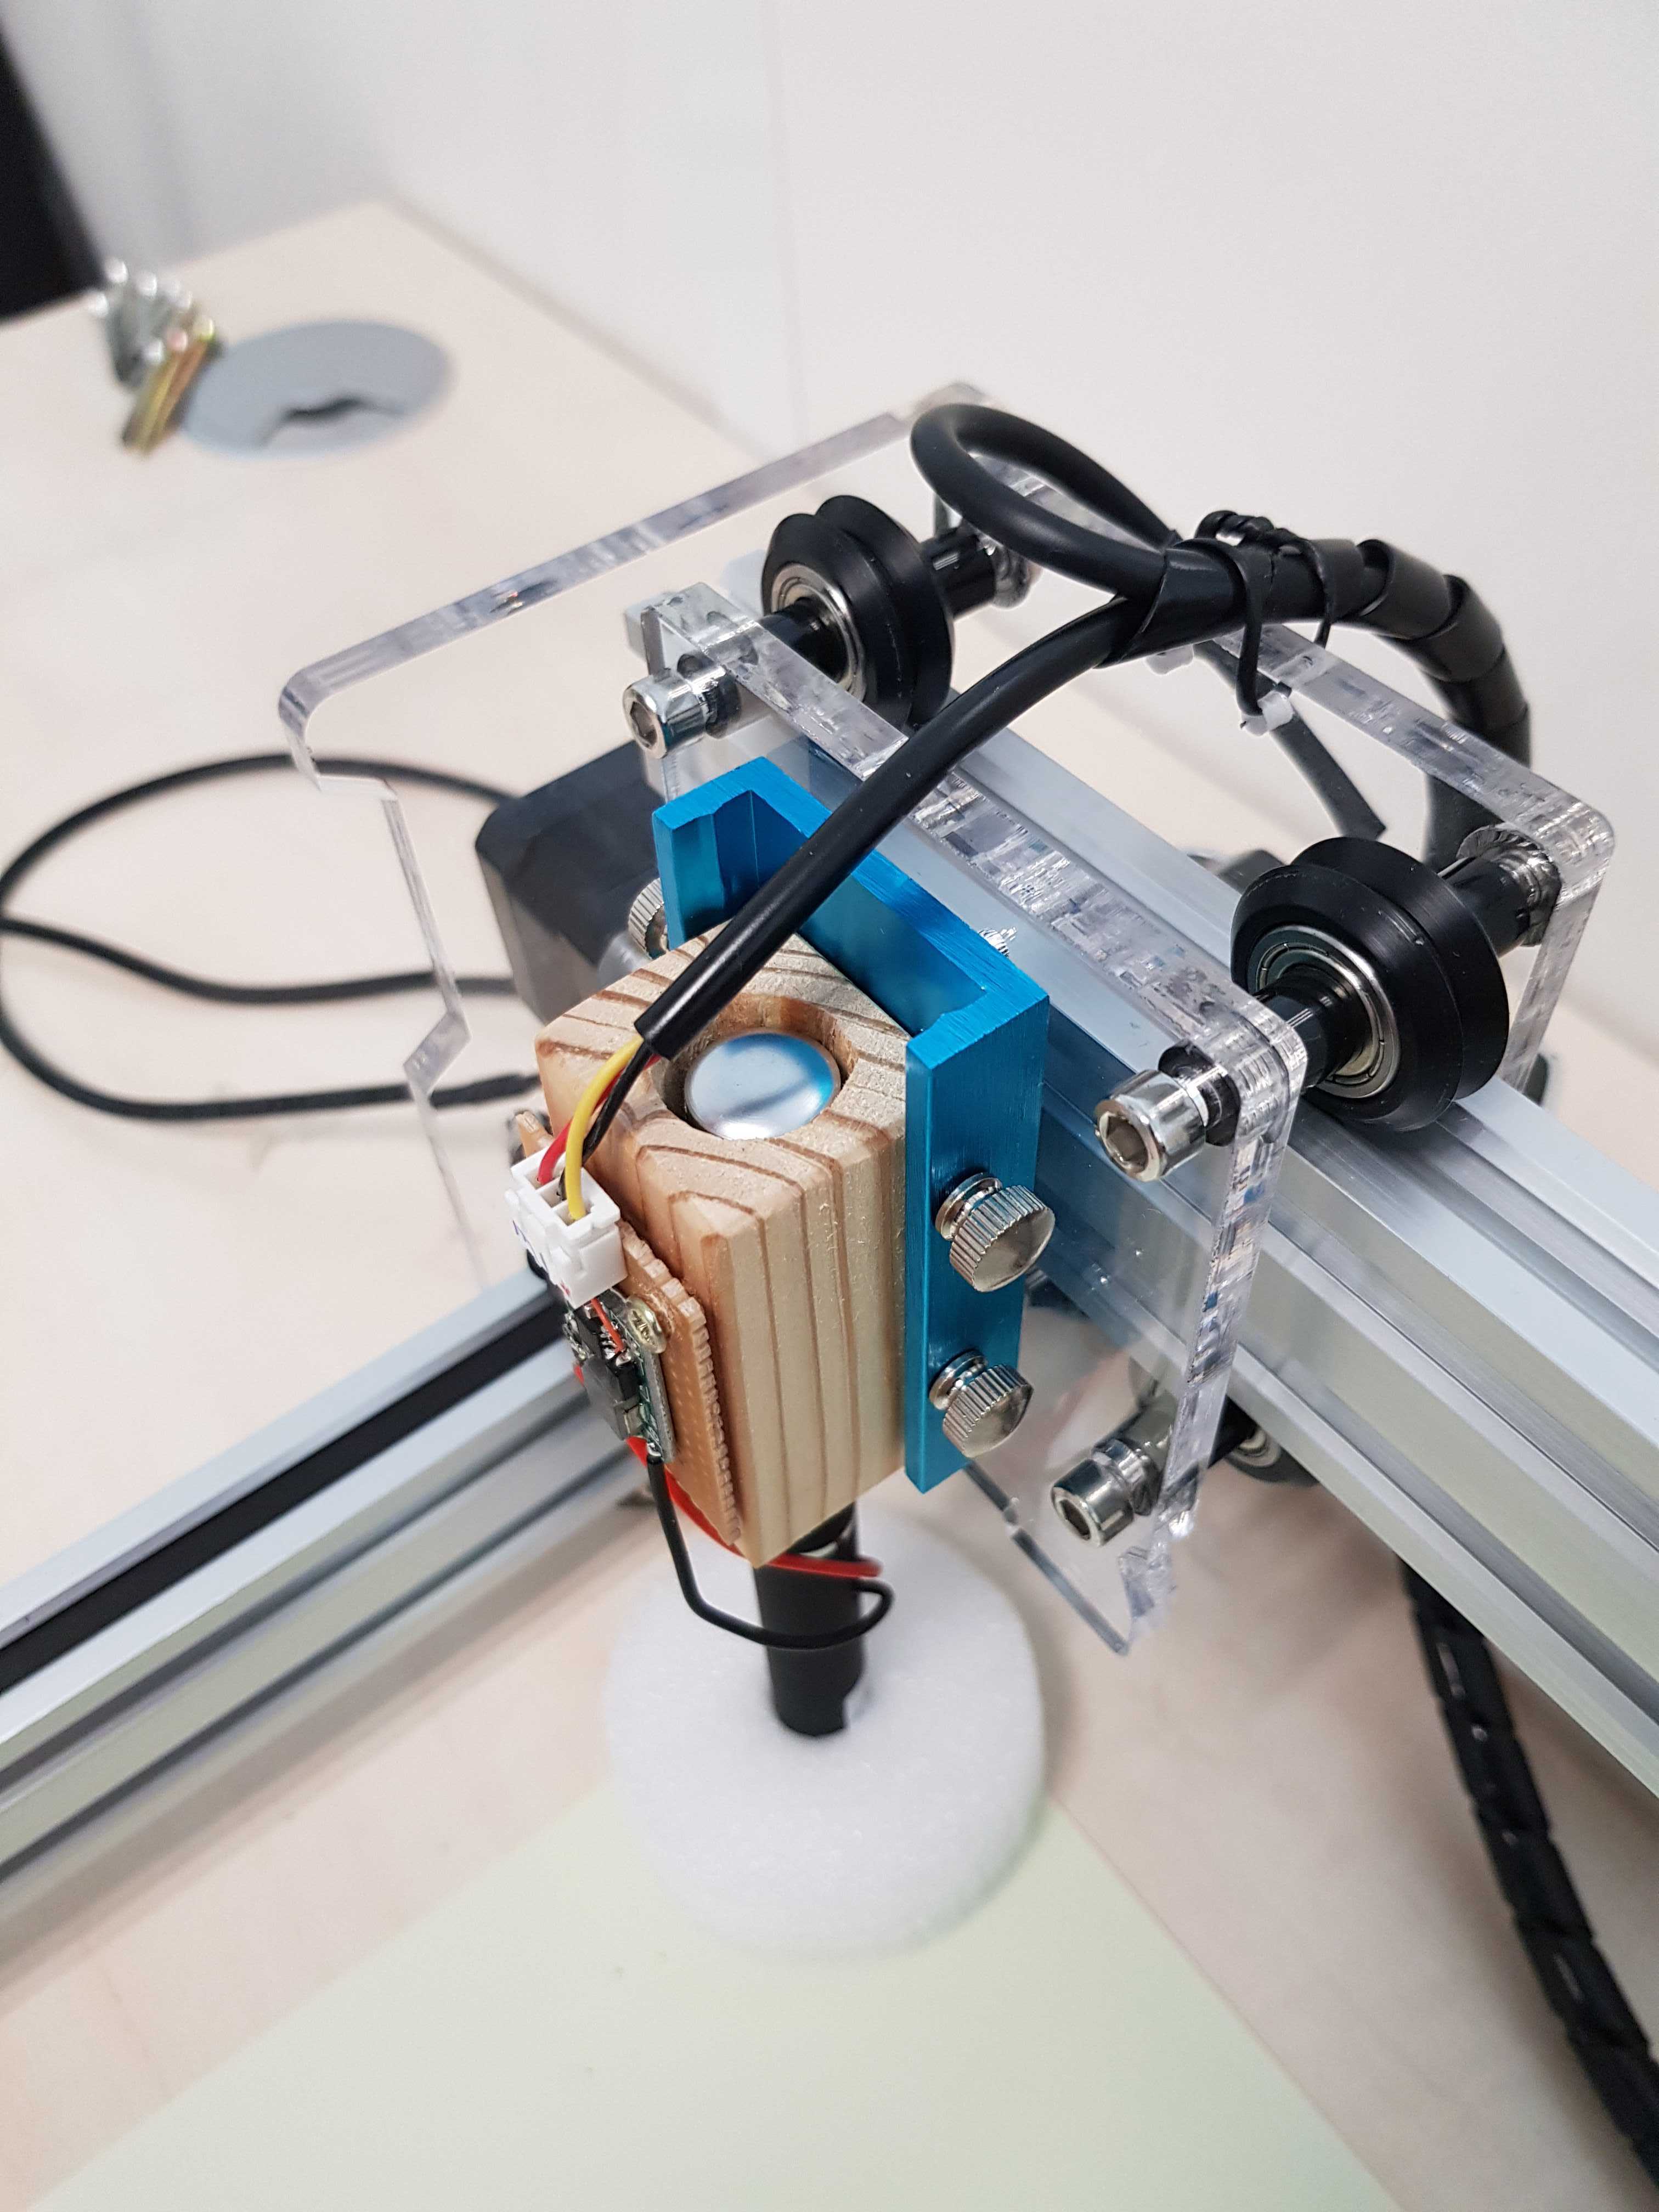
Then, you need to mechanically adapt the pointer to the machine, with a piece of wood or with a 3D printed part if you have more time to spend.
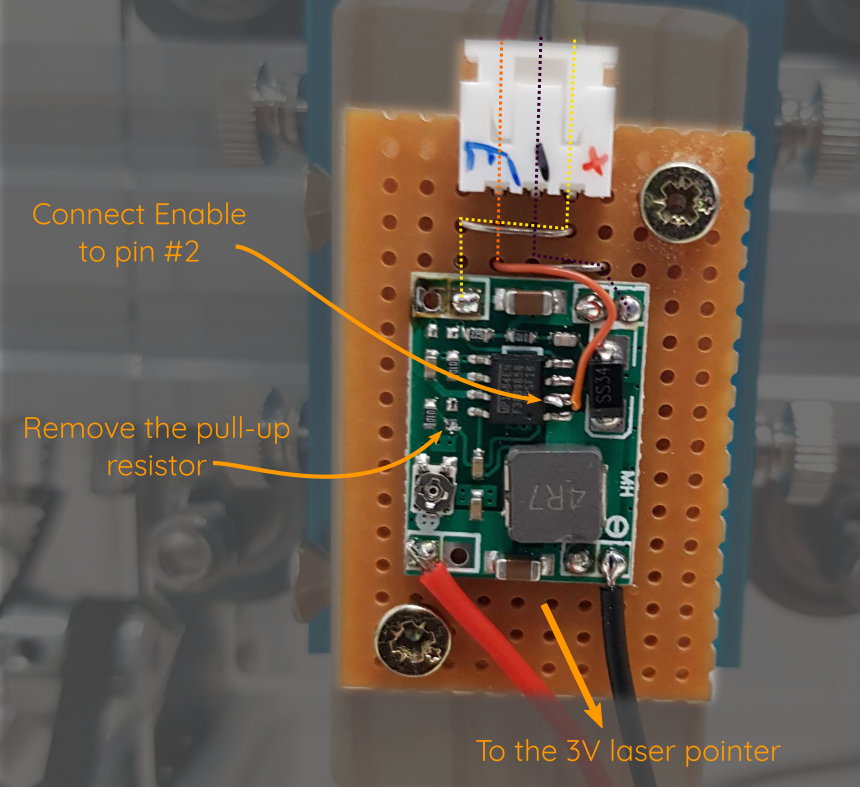
The 2.5watt laser is powered with +12V and an "enable" wire: electrical adaptation is trivial because MP1584 has an enable pin. You just need to remove the pull-up resistor on this pin and sold it to the enable wire.
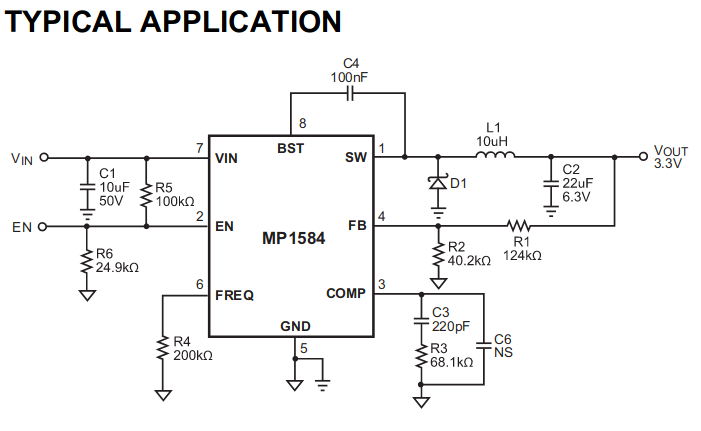
Do not forget to set the output voltage to 3V before connecting the laser pointer.
Raspberry Pi power
The machine 12V power supply is powerful enough to power the Raspberry Pi. Again, a little MP1584 will do the job. It fits into the raspberry case, behind the screen. To simplify wiring, it is better to power the raspberry via the screen.
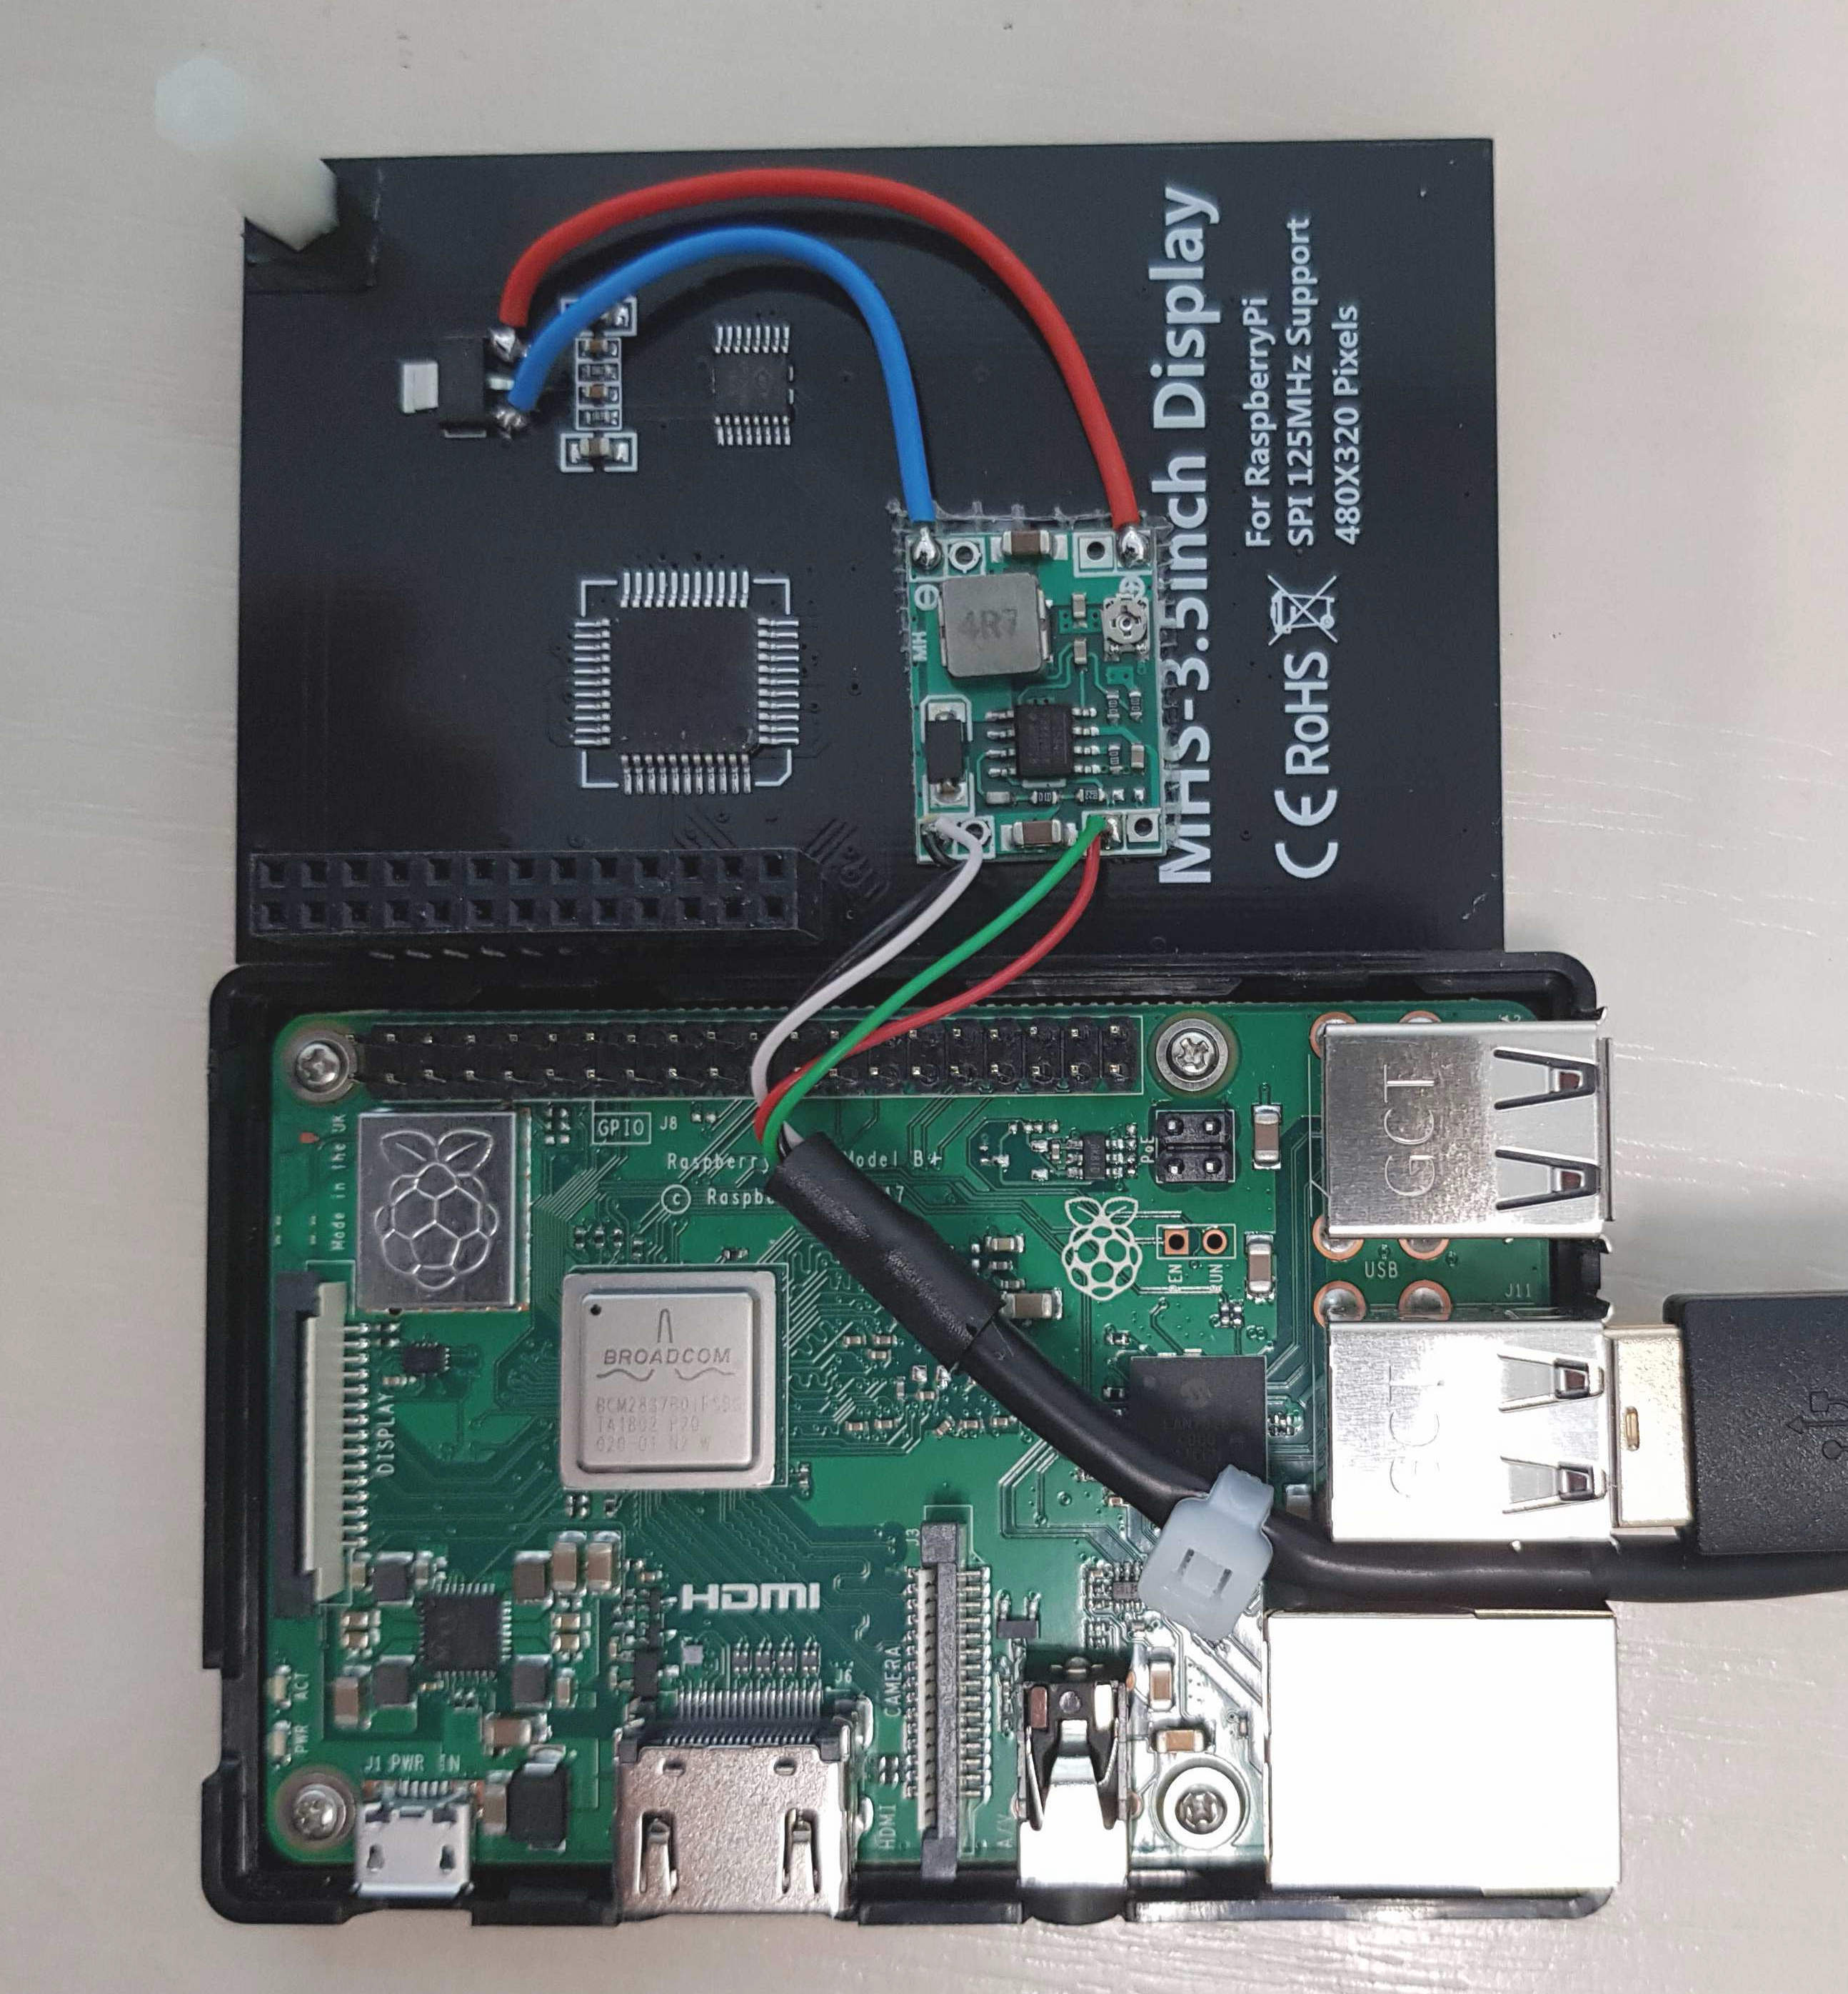
Set it to 5.1 V to be sure to avoid power problem on the Raspberry Pi.
Drawing time series with a laser on a phosphorescent plane, a Raspberry Pi and Warp 10. Share on XSoftware
Again, this project is proof of Warp 10 extensibility. There are three extensions: one to draw on the framebuffer (already used on the beer'o'meter), another one to write GRBL on the USB tty, and another one to add the SLEEP function, useful to slow down the display. processingToFramebuffer is available for everyone on WarpFleet. GRBL extension is not public yet (if you're interested, contact us).
Under the hood, there is only one WarpScript, stored in a 50-second runner warp10/warpscripts/grbl/50000/random.mc2
The video player

Warp 10 can handle binary values in time series since version 2.1. So, I will encode the video in several PNG images, then store the PNG as a GTS. FFmpeg is really helpful for that. The following bash script allows processing several video inputs stored in an "input" subdirectory.
#!/bin/bash
mkdir -p tmp

for file in ./input/*; do
  name=$(basename "$file")
  basename=${name%.*}
  echo "conversion of $basename"

  framerate=10
  h=320
  w=480
  ffmpeg -i "$file" -threads 8 -vf scale=$w:$h:force_original_aspect_ratio=decrease,pad=$w:$h:\(ow-iw\)/2:\(oh-ih\)/2,setsar=1 -r $framerate tmp/out_%05d.jpg
  outfile=$basename.gts

  echo "conversion to images done, starting a gts file $outfile"
  rm -f $outfile || true #if exists
  firstline=1
  line=""
  ts=0

  for rawimage in ./tmp/*; do
    ((ts++))
    value=$(base64 -w0 $rawimage|tr "/+" "_-")
    if [ $firstline -eq 1 ]; then
      firstline=0
      echo "$ts// imagesequence{title=$basename} b64:$value" >> $outfile
    else
      echo "=$ts// b64:$value" >> $outfile
    fi
  done
  rm -rf ./tmp
done
The output is an optimized GTS format with binary value:
1// imagesequence{title=introEtchASketch} b64:_9j_4AAQSkZJRgABAgAAAQABAAD__gARTGF2YzU3LjE…
=2// b64:_9j_4AAQSkZJRgABAgAAAQABAAD__gARTGF2YzU3LjEwNy4xMDAA_9sAQwAIBAQEBAQFBQUFBQUGBgYG…
=3// b64:_9j_4AAQSkZJRgABAgAAAQABAAD__gARTGF2YzU3LjEwNy4xMDAA_9sAQwAIBAQEBAQFBQUFBQUGBgYG…
=4// b64:_9j_4AAQSkZJRgABAgAAAQABAAD__gARTGF2YzU3LjEwNy4xMDAA_9sAQwAIBAQEBAQFBQUFBQUGBgYG…
=5// b64:_9j_4AAQSkZJRgABAgAAAQABAAD__gARTGF2YzU3LjEwNy4xMDAA_9sAQwAIBAQEBAQFBQUFBQUGBgYG…
=6// b64:_9j_4AAQSkZJRgABAgAAAQABAAD__gARTGF2YzU3LjEwNy4xMDAA_9sAQwAIBgYHBgcICAgICAgJCQkK…
=7// b64:_9j_4AAQSkZJRgABAgAAAQABAAD__gARTGF2YzU3LjEwNy4xMDAA_9sAQwAICAgJCAkLCwsLCwsNDA0N…
=8// b64:_9j_4AAQSkZJRgABAgAAAQABAAD__gARTGF2YzU3LjEwNy4xMDAA_9sAQwAICgoLCgsNDQ0NDQ0QDxAQ…
=9// b64:_9j_4AAQSkZJRgABAgAAAQABAAD__gARTGF2YzU3LjEwNy4xMDAA_9sAQwAIBAQEBAQFBQUFBQUGBgYG…
The video player is a loop on GTS values to decode each image and display them:
480 320 '2D3' PGraphics
0xff Pstroke
3.0 PstrokeWeight
'background' STORE

[ 'readtoken' 'imagesequence' { 'title' 'introEtchASketch' } NOW -1000 ] FETCH
0 GET
SORT
VALUES
<%
  //when you fetch binary, you get some iso-8859-1 encoded strings
  'iso-8859-1' ->BYTES 'imagebytes' STORE
  $background  $imagebytes Pdecode  //decode the image
  0 0 Pimage DUP
  'background' STORE //paste the image on the background
  '/dev/fb0' PtoFrameBuffer
%>
FOREACH
The random GTS generation
380 'width' STORE
270 'height' STORE
NEWGTS

0.0 'v' STORE
1 380
<%
  NaN NaN NaN $v RAND 0.5 - 2 * + 'v' STORE
  $v ADDVALUE
%> FOR
NORMALIZE

30 LTTB
'inputGTS' STORE
It is not a simple random GTS. You start at zero, the increment is random. Then you normalize the result between 0.0 and 1.0 with the NORMALIZE function, then you only keep 30 points with LTTB function.
The GRBL generation
You need to build a string with each GTS value. One way to do this is a custom mapper that returns nothing, but build the string you want:
$inputGTS
'M03 S0 F10000 '
true 'first' STORE
SWAP
[
  SWAP
  <%
    [ 3 7 ] SUBLIST FLATTEN
    LIST-> [ 'tick' NULL NULL NULL 'val' NULL ] STORE
    'G0 X' $tick  TOSTRING + ' ' + 'Y' $val $height * 'y' STORE $y TOSTRING + '%0A' + +
    +
    $first <% 'M03 S1000%0A' + %> IFT
    false 'first' STORE
    [ 0 NaN NaN NaN NULL ]
  %>
  MACROMAPPER
  0 0 0
] MAP
DROP
'S10%0A' +
'G0 X0 Y0%0A' +
'S10000%0A' + //turn on the laser again to make sure the tool goes to 0
0
'S0%0A' +
DUP
GRBLSEND
The output is:
M03 S0 F10000
G0 X1 Y43.04538922681426
M03 S1000
G0 X10 Y87.46233827109988
G0 X24 Y139.1689621969481
G0 X28 Y119.72726588709227
G0 X41 Y131.69524004157586
G0 X54 Y100.6604201151945
G0 X75 Y97.24474169638347
G0 X81 Y79.54108843083182
G0 X100 Y30.48676065906525
G0 X114 Y78.43331848202173
G0 X119 Y57.384263349507364
G0 X142 Y0.0
G0 X148 Y21.245979053880475
G0 X159 Y58.79110242747617
G0 X179 Y99.52730433063698
G0 X190 Y59.882186179509816
G0 X198 Y95.91177475525515
G0 X215 Y49.77198273070387
G0 X228 Y124.55468659731648
G0 X237 Y82.22572446843881
G0 X260 Y158.88587411516895
G0 X266 Y148.36603476372318
G0 X282 Y98.97557857085135
G0 X295 Y114.99898058375837
G0 X306 Y150.23913980906022
G0 X316 Y174.79534467165988
G0 X337 Y258.2782760973157
G0 X352 Y265.14565752794346
G0 X361 Y213.20580859092698
G0 X380 Y226.71478171192967
S10
G0 X0 Y0 S10000 S0
The result:
Conclusion
Well, Warp 10 is a database. A GEO TIME SERIES DATABASE. But you can implement whatever function you need in a Warp 10 extension!
If you have some funny ideas, tell us on Twitter!
| Discover how to create a Grafana BeerTender Dashboard connected with Warp 10 |
Read more
Real-time failure... Clock drift!
Amzair: A 10-year warranty, thanks to IoT
All about the Geo Time Series Model

Electronics engineer, fond of computer science, embedded solution developer.