Discovery, the Warp 10 dashboard as code solution, is now ready for production! Follow this tutorial to setup a production-ready server…
Remember… 2 years ago, SenX started to create some Web Components to build HTML dashboards easily: that was explained in the UFO part3 article, and it was not really easy. This early idea led us to develop a full dashboard as code solution, which we called Discovery.
More recently, we released Discovery Explorer, to easily browse your dashboards.
It is time to bring all this together!
In this article, you will learn how to:
- Create and test your dashboard with the latest VSCode plugin.
- Deploy discovery explorer on your server.
- Deploy HAProxy and setup a HTTPS connection with basic authentication to get a fully working production environment.
| More Discovery resources on discovery.warp10.io and the blog. |
VSCode discovery snippets
It's time to update your VSCode extensions! Once done, you will run at least v2.1.14 of the extension, and it comes with really useful snippets.
Create a new file, choose WarpScript language (note this can be your default language in VSCode settings…), and type "disco":
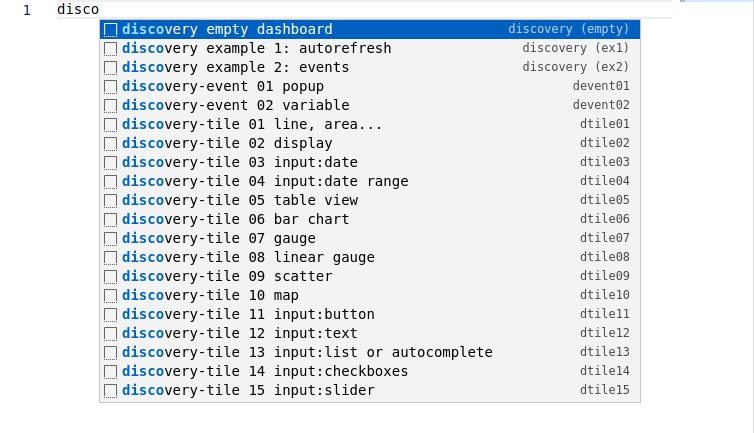
Among all the snippets, you have two full examples, ready to play. Select "example 2", change the first line to use your endpoint, and execute the WarpScript (Ctrl+Alt+E).
What is exactly a discovery dashboard?
It is a valid WarpScript that returns a MAP:
  {
    "title": "Discovery Dashboard",
    "description": "test",
    "type": "flex",
    "cols": 4,
    "cellHeight": 120,
    "vars": {},
    "options": {
      "showErrors": true
    },
    "tiles": [
      {
        "type": "display",
        "w": 4,
        "h": 2,
        "title": "",
        "options": {
          "eventHandler": "type=variable,tag=input"
        },
        "macro": "<% { 'data' 42.0 } %>"
      }
    ]
  }
Each tile will be a Web Components that will execute the code contained in "macro" of the tile.
It means that tiles do not share the same WarpScript stack. So for example, if you plan to use AUTHENTICATE and LIMIT, you should do it in every macro. If you want to define constants outside the dashboard MAP, you must use early binding or DEREF. Examples will help you.
The beauty of Discovery is that tiles can communicate together through events and variables. So, you can have one tile that does the heavy work to FETCH and process data, then distribute the results to the other tiles. You can also have buttons, inputs, popups… Again, try all the snippets to learn.
To remain consistent, we keep the .mc2 file extension. It is just another WarpScript, that can be used by 3 tools:
- When you add
// @preview discoveryas a special comment at the beginning of the file, VSCode extension will execute the code and wrap the result in a web page, using <discovery-dashboard> webcomponent. There are no external resources, your instance and your computer can be offline. - Coming soon: When you add
// @preview discoveryas a special comment at the beginning of the file, WarpStudio will wrap it directly into a web page. - Discovery explorer will serve the script directly in its embedded web server. This can also be used offline.
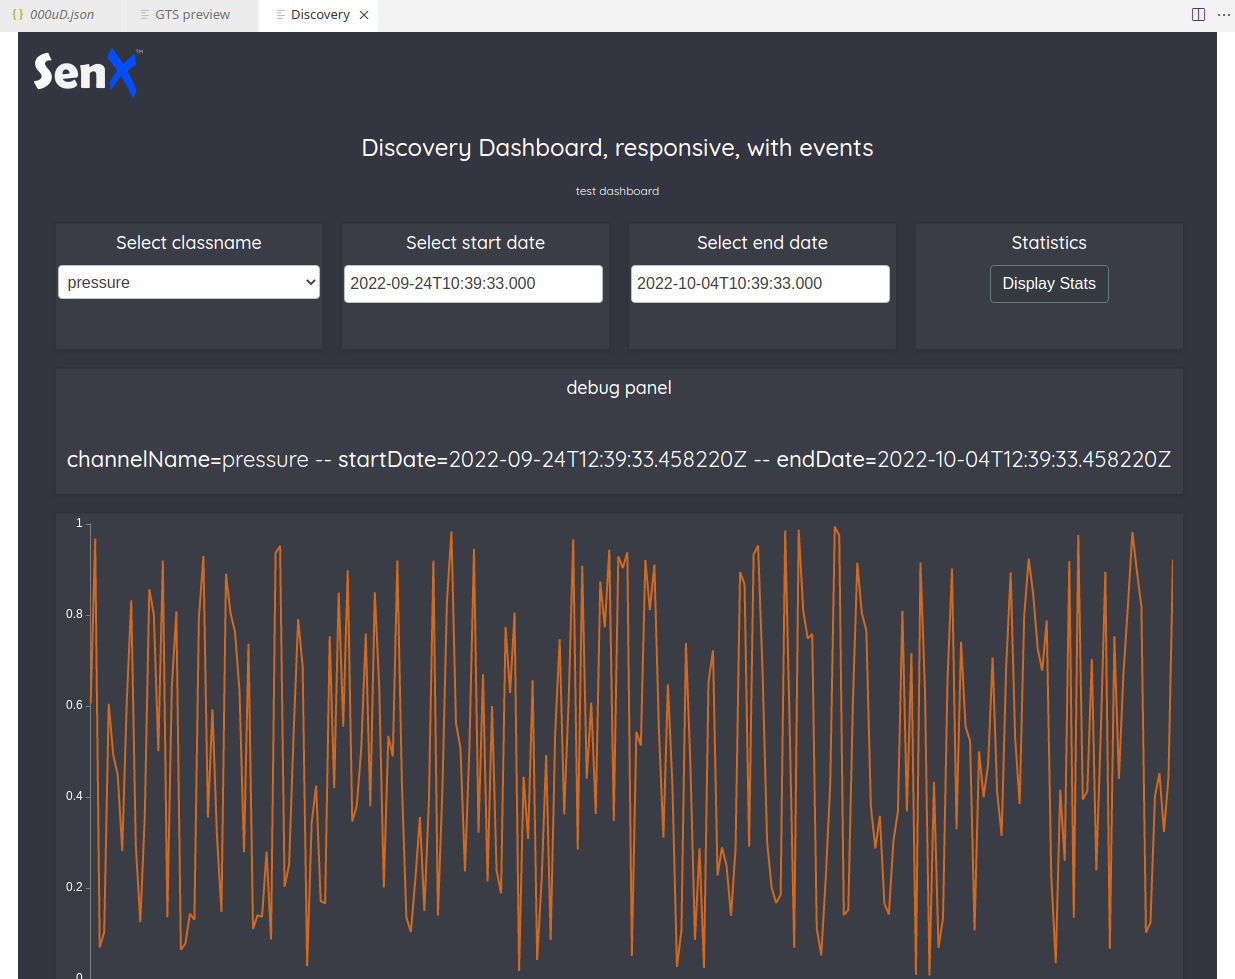
Create your dashboards
Using the snippets, create an empty dashboard than will display a clock (UTC):
All the tile snippets embed lots of comments and documentation. You start with the empty dashboard snippet, then you add tiles with the snippet tiles. This convenient snippet list will grow in the future. For more documentation, please refer to the online discovery documentation.
To go on with this tutorial, create /opt/warp10/discovery, and save your example dashboard as /opt/warp10/discovery/example.mc2.
Discovery Explorer
Discovery explorer is a simple dashboard browser. We will run it with docker:
docker run --rm -d -p9090:3000 -e BASE_HREF=/discovery/ -v /opt/warp10/discovery/:/data --name=discovery-explorer warp10io/discovery-explorer:latest
The BASE_HREF variable will relocate the website root to http://yourserver:9090/discovery/.
Once launched, you should be able to browse your dashboard on http://yourserver:9090/discovery/.
That's great, but not production ready. You need to setup SSL (https) for Discovery and the Warp 10 endpoints, and authentication to access your dashboards. To do so, we will use HAProxy and Let's Encrypt.
Make it secure
First, install haproxy and certbot on your server:
# adapt this command to your favorite Linux distribution...
# for Ubuntu, apt-get install haproxy certbot
sudo pacman -Sy haproxy certbot
The following HAProxy setup will listen on port 80 (for the moment), redirect /api/v0 to Warp 10 8080 port, redirect /discovery to Discovery 9090 port, and refuse all the other connections. I assume warp.domain.xx points to the server (the matching A entry in your DNS records points to the server public IP).
Edit /etc/haproxy/haproxy.cfg:
# Custom HAProxy v2.6.6 configuration

global
    maxconn     20000
    log         127.0.0.1 local0
    user        haproxy
    chroot      /usr/share/haproxy
    pidfile     /run/haproxy.pid
    daemon

userlist mycredentials
   # mkpasswd -m sha-256 mypassword123 (for not encrypted, use insecure-password)
   user pierre  password $5$YgCs4G7K5.wg3$x6mmYVD1jPIIdH6sgheBUNoH/Ukn/.PnmeKthkL05
   user zzzz    password $5$gjBttp5h6Iqd5rS$B9OuZNftw7S61dXKGyrjt44COz/XP3yq9Iq7


frontend  https-in
    bind :80
#    bind :443 ssl crt /etc/ssl/warp.domain.xx/warp.domain.xx.pem
#    http-request redirect scheme https unless { ssl_fc }
    mode http
    log                  global
    option forwardfor
    option forwardfor header X-Real-IP
    maxconn              8000
    timeout              client  300s

    acl letsencrypt-acl path_beg /.well-known/acme-challenge/
    use_backend letsencrypt-backend if letsencrypt-acl

    acl use_warp10_path path_beg /api/v0/
    use_backend warp10          if use_warp10_path

    acl use_discovery path_beg /discovery
    use_backend discovery if use_discovery

    default_backend no-match

backend warp10
    mode http
    server w1 127.0.0.1:8080 check
    timeout     connect 5s
    timeout     server  300s

backend discovery
    mode http
    server d1 127.0.0.1:9090 check
    http-request set-path "%[path,regsub(^/discovery/api,/api)]"
    http-request auth unless { http_auth(mycredentials) }
    timeout     connect 5s
    timeout     server  300s

backend letsencrypt-backend
    mode http
    server letsencrypt 127.0.0.1:8888
    timeout     connect 5s
    timeout     server  300s

backend no-match
    mode http
    http-request deny deny_status 403
There is one trick in this configuration: Certbot is able to behave as a webserver, so we can redirect the let's encrypt challenge to it. For the moment, keep the comments on SSL lines. To setup HTTPS, you need http first.
Generate a username and a password hash, as documented, from any Linux machine, to personalize the user list.
Restart or reload haproxy, then ask for a certificate:
sudo certbot certonly --standalone -d warp.domain.xx \
    --non-interactive --agree-tos --email contactemail@xxx.zzz \
    --http-01-port=8888
HAProxy wants fullchain and private key to be in the same file, so you need to concatenate both:
sudo mkdir -p /etc/ssl/warp.domain.xx

sudo cat /etc/letsencrypt/live/warp.domain.xx/fullchain.pem /etc/letsencrypt/live/warp.domain.xx/privkey.pem | sudo tee /etc/ssl/warp.domain.xx/warp.domain.xx.pem
It is time to test your brand new certificate… Edit /etc/haproxy/haproxy.cfg again, remove the comments before bind and HTTPS redirect lines, and reload HAProxy. It should work:
- https://warp.domain.xx/ must return a 403 error
- https://warp.domain.xx/api/v0/exec should return
[] - https://warp.domain.xx/api/v0/discovery should ask you to authenticate first
- any HTTP request should switch to HTTPS automatically.
Automate certificate renew
The last step is to automate the certificate renew, once a month… To do so, edit /home/update-letsencrypt-certificates.sh, and personalize the following script:
#!/bin/sh

# script to renew let's encrypt certificate, concatenate them, reload haproxy

certbot renew --force-renewal --http-01-port=8888

cat /etc/letsencrypt/live/warp.domain.xx/fullchain.pem /etc/letsencrypt/live/warp.domain.xx/privkey.pem | tee /etc/ssl/warp.domain.xx/warp.domain.xx.pem

systemctl reload haproxy.service
Make it executable, and test it. It should renew your certificate. To automate this, you can create a systemd timer, or just use the root crontab. As root, edit it (crontab -e) and add this line to renew your certificate at 12h15 every first day of the month:
#min hour day Month Day_Of_Week Command
12   15   1   *     *           /home/update-letsencrypt-certificates.sh
Done?
As explained, a Discovery dashboard is just another WarpScript. It is really easy to version your dashboards on your company git… And to deploy them automatically with WarpFleet Sync on your server! Just as you already do for macros: follow this tutorial if you are not familiar with WarpFleet Sync.
If you're working in a big company, instead of basic authentication, you can set up LDAP or a more advanced authentication system. Good luck, it is not as easy.
After a few months of adjustments, Discovery is production ready:
- You can use VSCode to create dashboards, test them, and commit your changes.
- You can use WarpFleet Sync to copy them from your git to your server
- You can use Discovery Explorer to serve them to your company users, with SSL and authentication.
If you have good ideas to extend the ecosystem, do not hesitate to contact us (or join the Warp 10 Lounge on Slack).
| Discovery Tips&tricks #1: Synchronization of zoom and focus between charts Discovery Tips&tricks #2: Reproduce the WarpStudio Plot view Discovery Tips&tricks #3: Build a form |
Read more
Speeding up your analytics with SHM
Server monitoring with Warp 10 and Telegraf
Covid Tracker built with Warp 10 and Discovery

Electronics engineer, fond of computer science, embedded solution developer.