Learn how to connect the Warp 10 platform with n8n, a workflow automation tool. A guest post by Nicolas Steinmetz, Founder of CerenIT
Some time ago, as Mathias knew I was using n8n to automate weekly news generation for the BigData Hebdo podcast, he asked me if we could do a similar thing between n8n and Warp 10 as with node-red and Warp 10.
Short answer is yes but let's see how we can make it happens.
| Lire l'article originel en français : n8n & Warp 10 – Automatisez vos manipulations de séries temporelles |
Node Automation
For those who don't know n8n, it stands for "node automation". It's an open-source automation solution which aims to automate processes through workflow creation. It's an alternative to SaaS services such as Zapier or IFTTT. Each workflow contains steps represented by nodes. Each node can be connectors to existing services (GDrive, Slack, Weather, etc.), generic operators (HTTP request, webhooks, functions, set, etc.), logical operators (if, etc.) or data transformations. For each step of the workflow a given node is instantiated and parametrized. Nodes can be linked with others and as such, the output of a node can be the input of the following node.
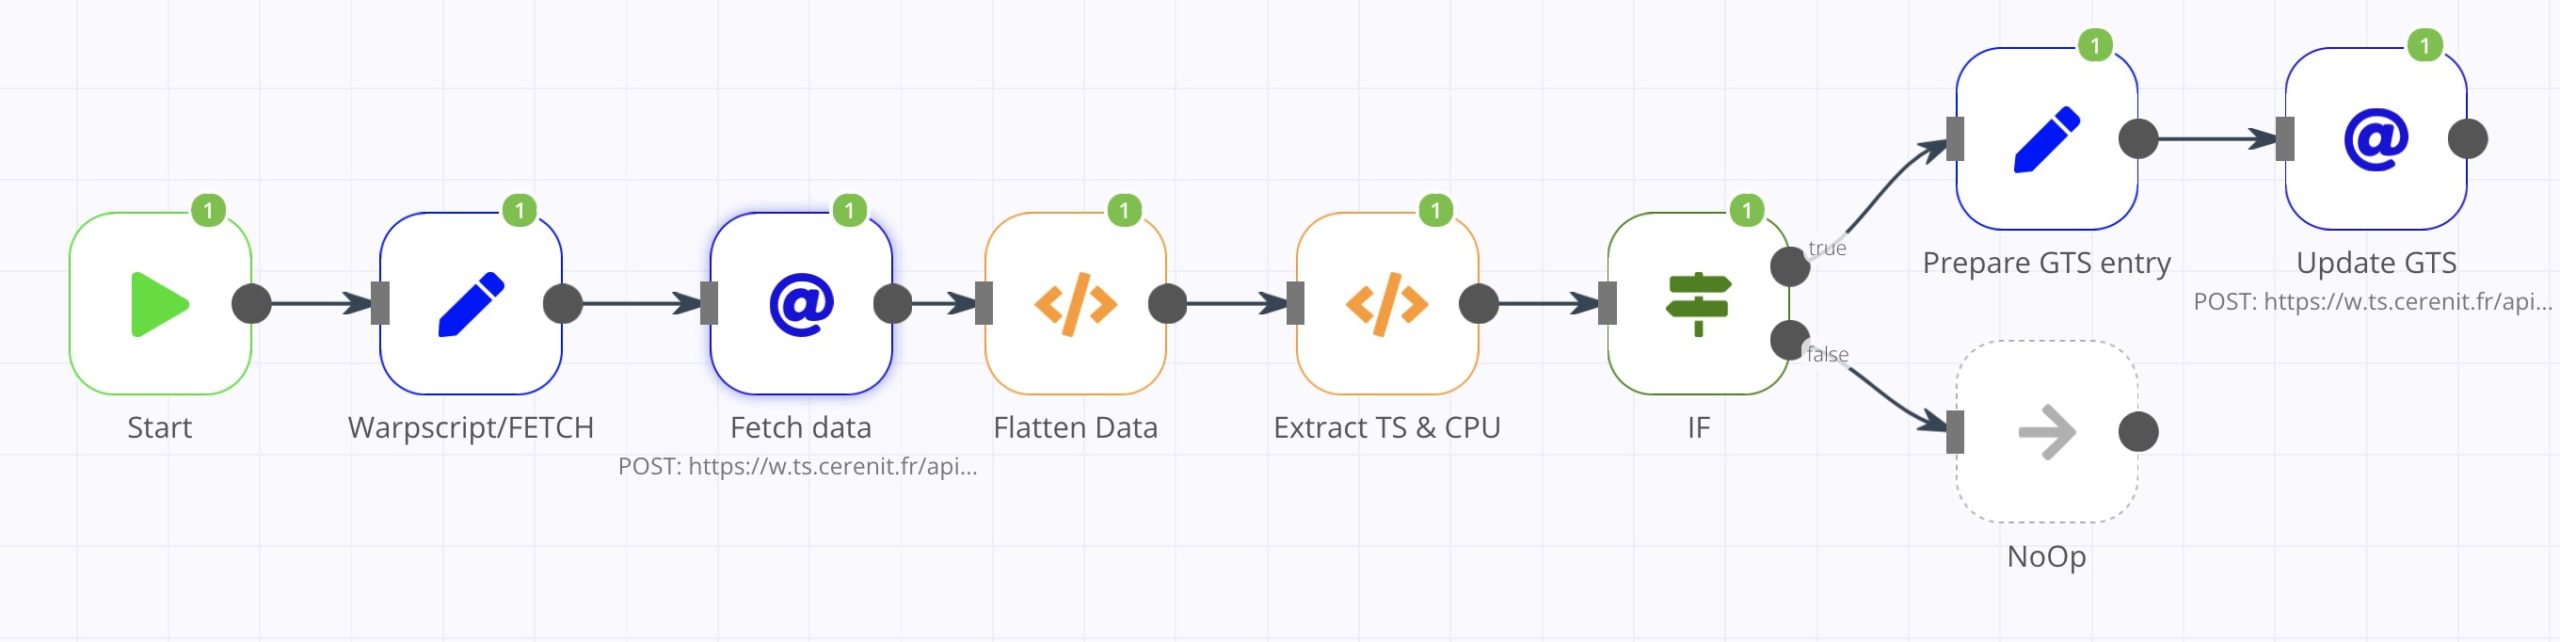
The workflow we will implement is basic and aims to illustrate:
- The ability to fetch a monitoring entry stored in Warp 10
- If the value is greater or equal to 90%; then create a new entry in a new dedicated GTS in Warp 10.
It's not the most awesome workflow by far, but it allows implementing HTTP calls to Warp 10:
- First call will test WarpScript code submission via its dedicated endpoint
/api/v0/exec. As you'll see, code is simple and could have used the Fetch endpoint, but idea was to test WarpScript code execution - Second call will use the update endpoint API
/api/v0/update. We can evaluate the HTTP call with the custom authentication headerX-Warp10-Token.
Before starting the workflow, let's define our WarpScript code to fetch the CPU idle value in percent for one of my servers:
'<readToken>' 'readToken' STORE
[
$readToken
'crnt-ovh.cpu.usage_idle'
{ "host" "crnt-d10-gitlab" "cpu" "cpu-total" }
NOW
-1
] FETCH
The output:
[
	[{
		"c": "crnt-ovh.cpu.usage_idle",
		"l": {
			"host": "crnt-d10-gitlab",
			"cpu": "cpu-total",
			"source": "telegraf",
			".app": "io.warp10.bootstrap"
		},
		"a": {},
		"la": 0,
		"v": [
			[1634505650000000, 91.675025]
		]
	}]
]
Create a Set node
n8n offers a node called HTTP Request. As its name suggest, it allows making HTTP requests to a remote endpoint. However, it's not possible to write the WarpScript code and the related HTTP call. We need first to define an object holding the WarpScript code and pass it to the HTTP Request node.
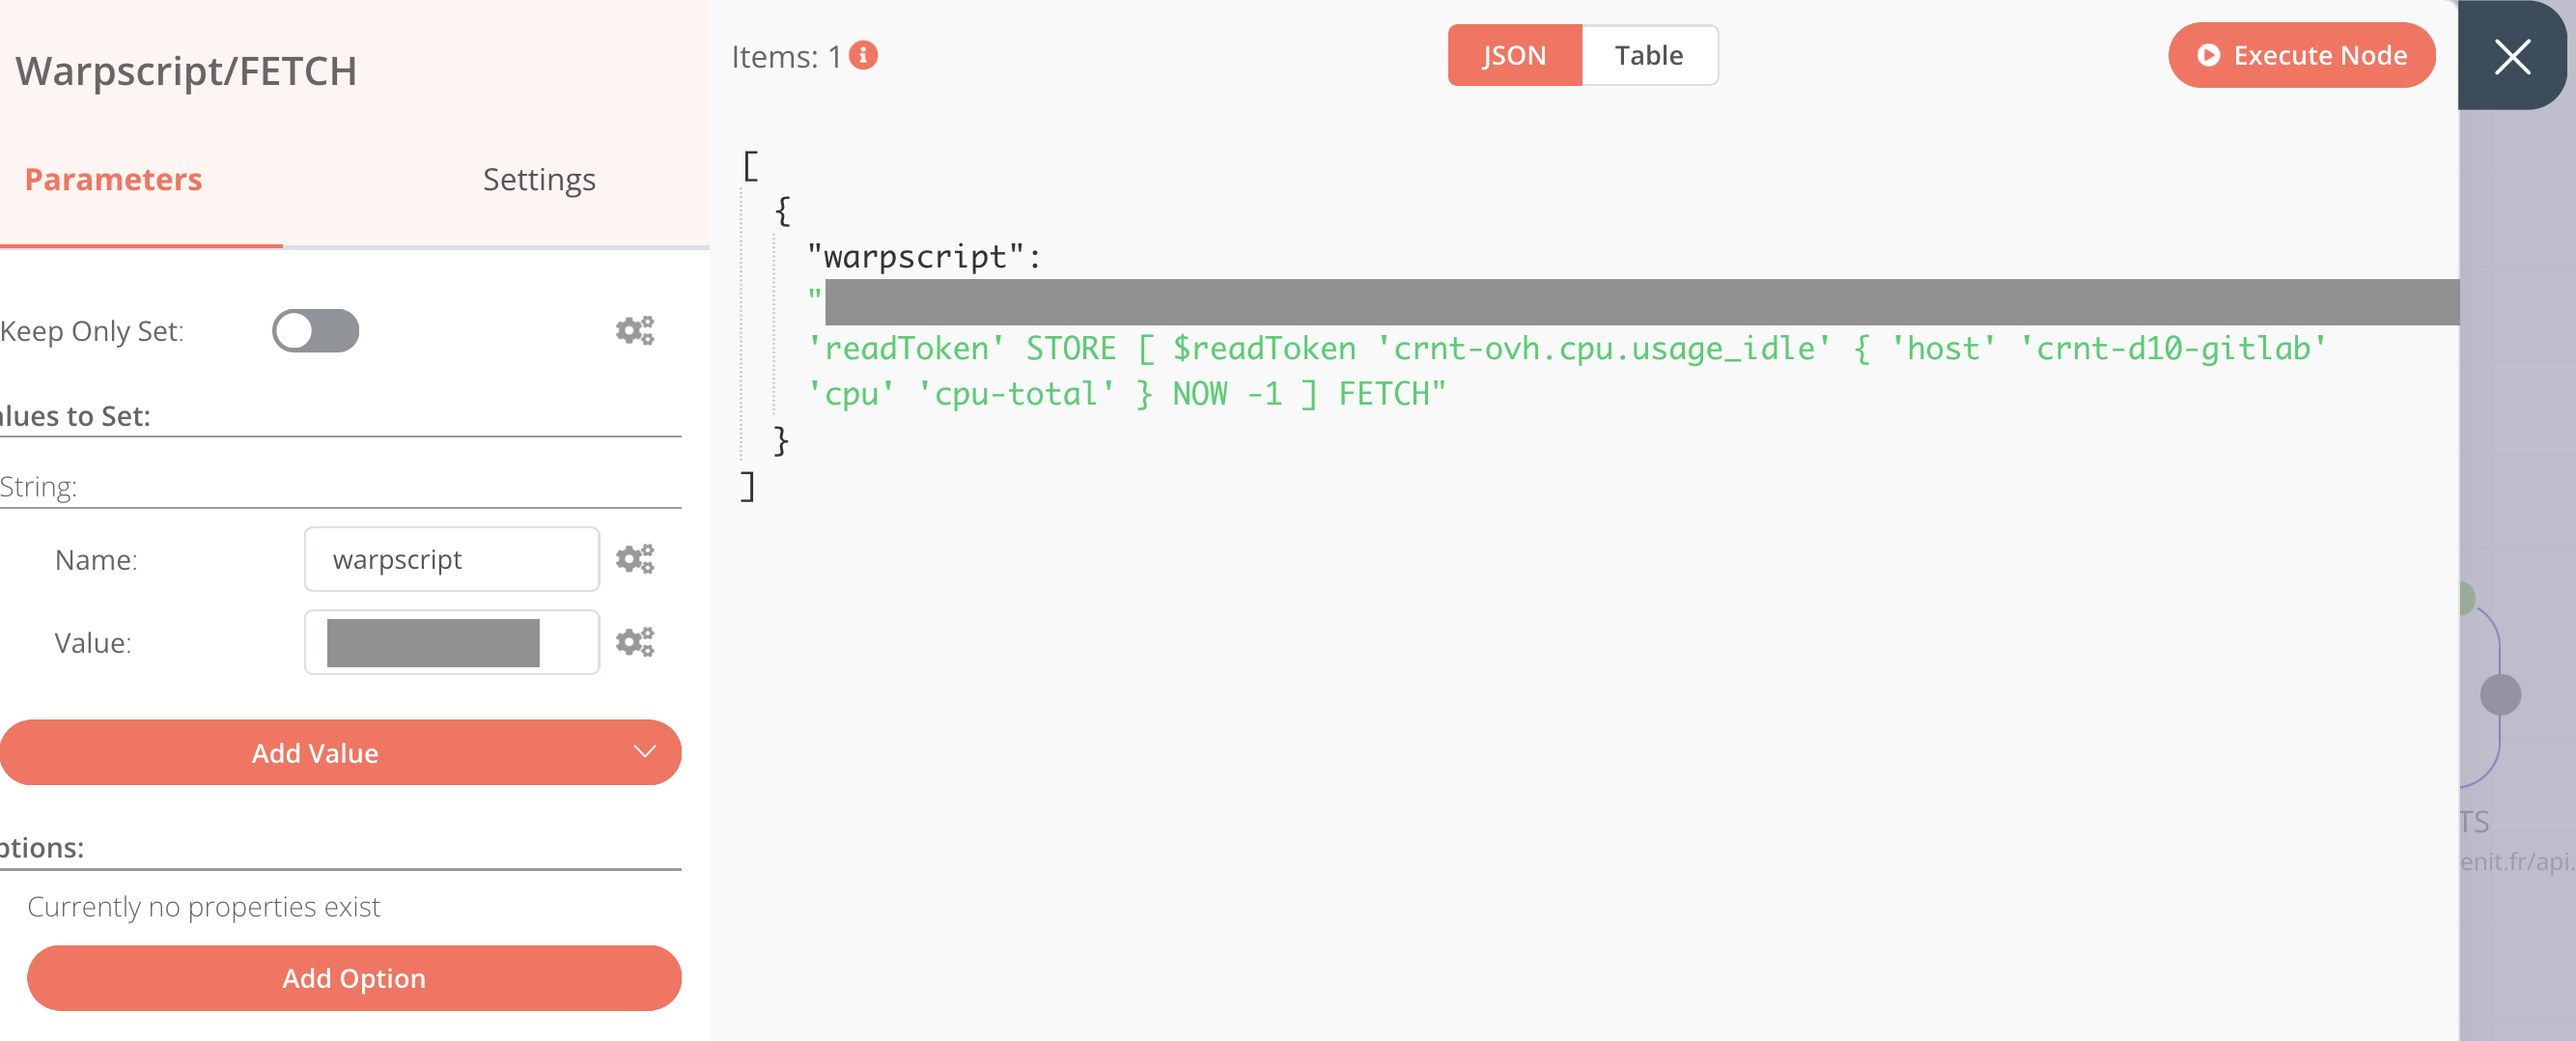
To store the WarpScript code in an object, we'll use the Set node. Once the Set node is added in the workflows, go to Parameters > Add Value > Type: String and fill as below:
- Name: warpscript
- Value: the WarpScript code above
If we click on "Execute Node", we can validate that the warpscript variable contains our WarpScript code. Grayed area hide my tokens:
| Learn advanced features of Warp 10 scheduler: Runners are an easy way to automate WarpScript, without any new external component. |
Create an HTTP Request node
We can now add an HTTP Request node in the workflow, link it to the Set node we just created. Thus, the HTTP Request node will automatically have access to the output of the Set node.
Configure the HTTP Request node as follows:
- Parameters:
- Request Method: POST
- URL:
http://url.of.your.warp.10.instance/api/v0/exec - Enable the JSON/RAW Parameters
- Options:
- Add Option > Mime Type: text/plain
- Add Option > Body Content Type: RAW/Custom
- Body Parameters > Add Expression > Current Node > Input Data > JSON > warpscript (columns on the right side will be filled once you click on warpscript. On the upper side, you will see the variable and on the bottom, the value of your variable ; click on the close icon to go back to previous screen).
Once we click on "Execute Node", the result of the HTTP request is visible (grayed area hides my token):
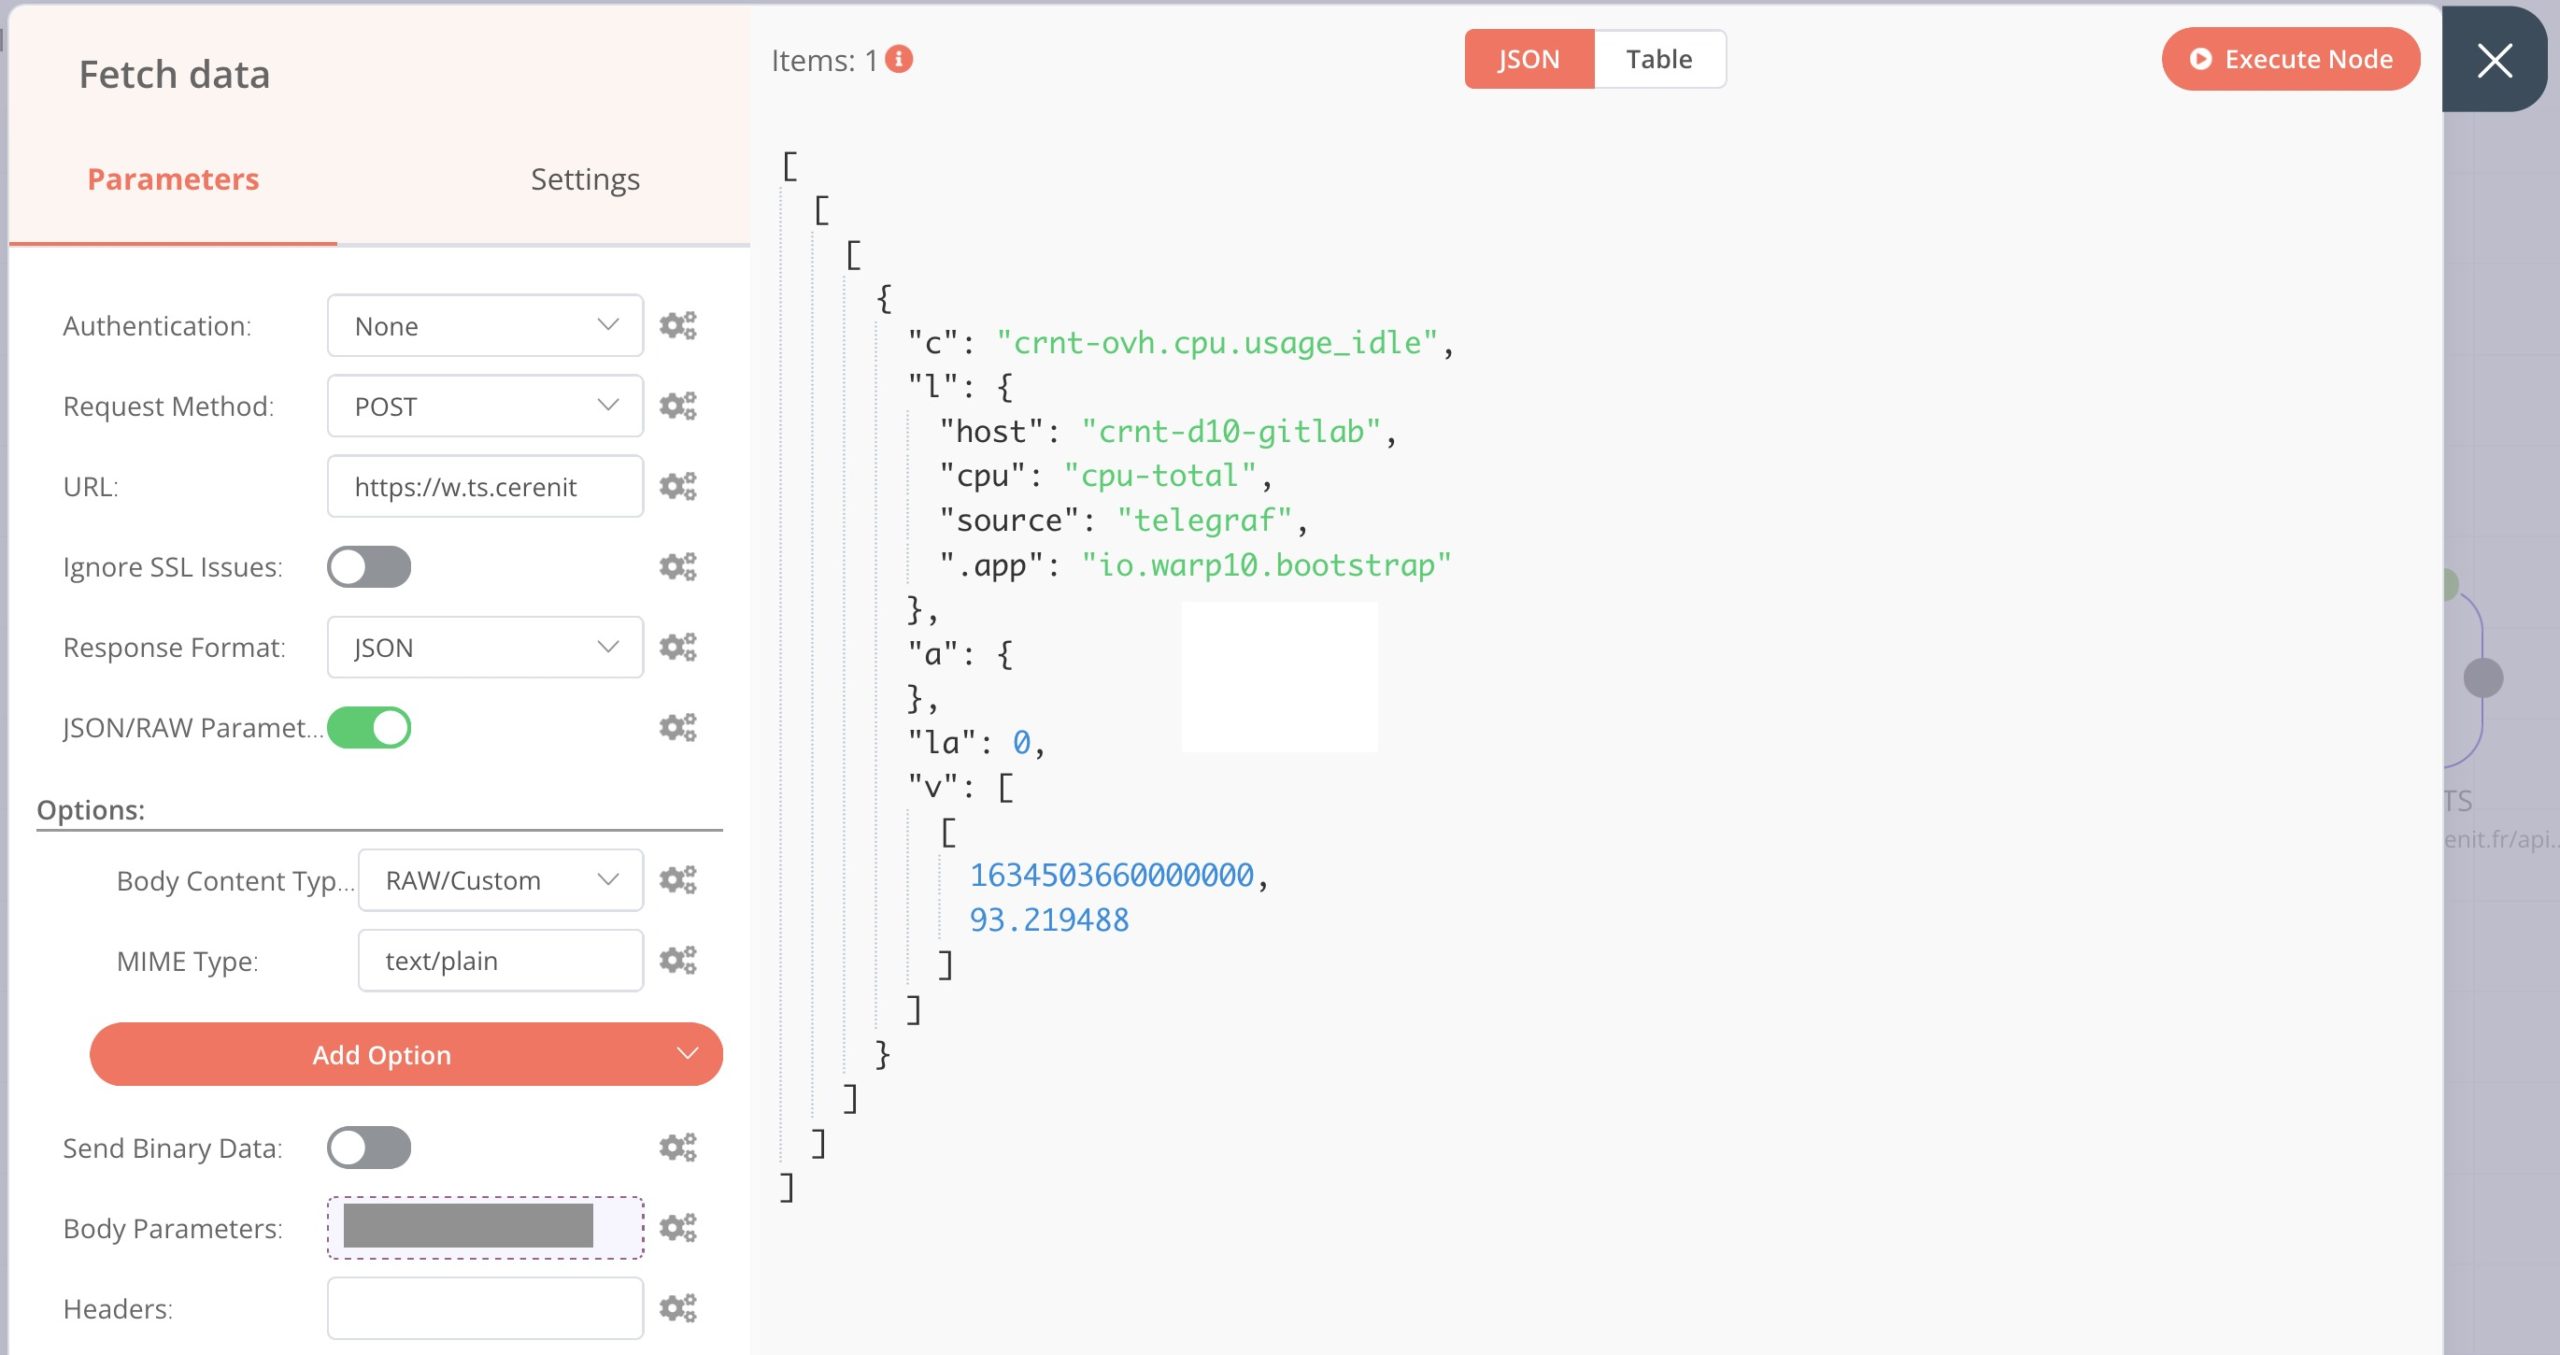
We get a similar JSON object as previously but more nested. We will flatten the object and extract only the timestamp and the value of the CPU by using the Function node twice. We'll chain these two function nodes to the HTTP request node. Function node allows executing Javascript code on data and run transformations which are not handled by other provided nodes. These two nodes will not be detailed here as it's not the main point of the article.
We just need to know that after this two function nodes, data is as simple as the following object:
[{
	"ts": 1634503660000000,
	"cpu": 93.219488
}]
The IF node will not be detailed either ; it's just to introduce a logical step in the workflow. If the value of "cpu" is greater or equal to 90, test will be considered as true and false otherwise. If test is false, then a noOp node is added in the workflow. It does nothing except showing the end of the workflow.
Prepare the GTS to be updated
If the test is true, i.e. value of CPU is greater or equal to 90, then we will insert the timestamp and the value in a dedicated GTS called n8n in Warp 10. As we did previously, we need to make it in two steps:
- Prepare data using the GTS Input Format and store it as a property of an object with the Set node
- Do the HTTP call.
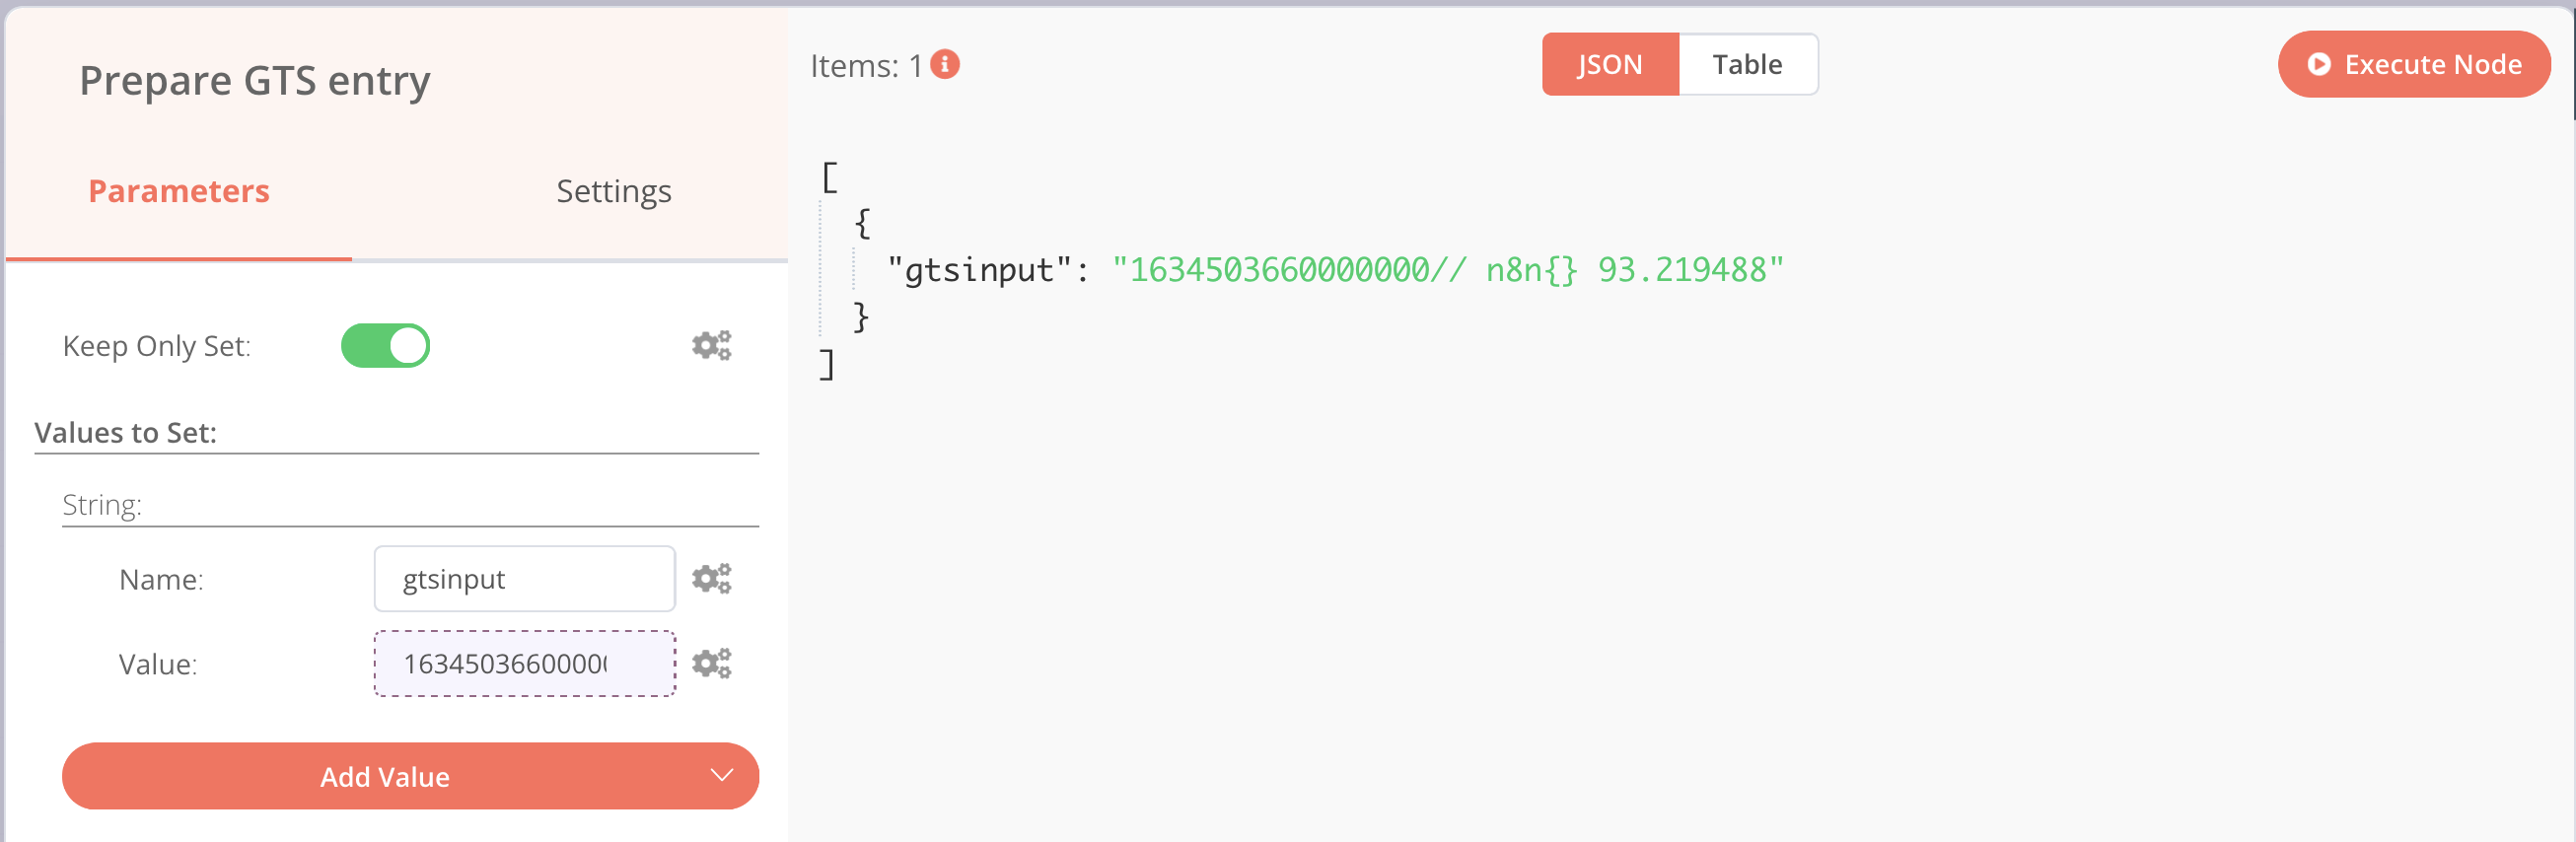
Let's add a node Set, and in Parameters > Add Value > Type: String, fill as described below:
- Name: gtsinput
- Value > Add Expression and in the expression section, we add the code to use our two values and describe a valid GTS entry:
{{$json["ts"]}}// n8n{} {{$json["cpu"]}}
As you can see:
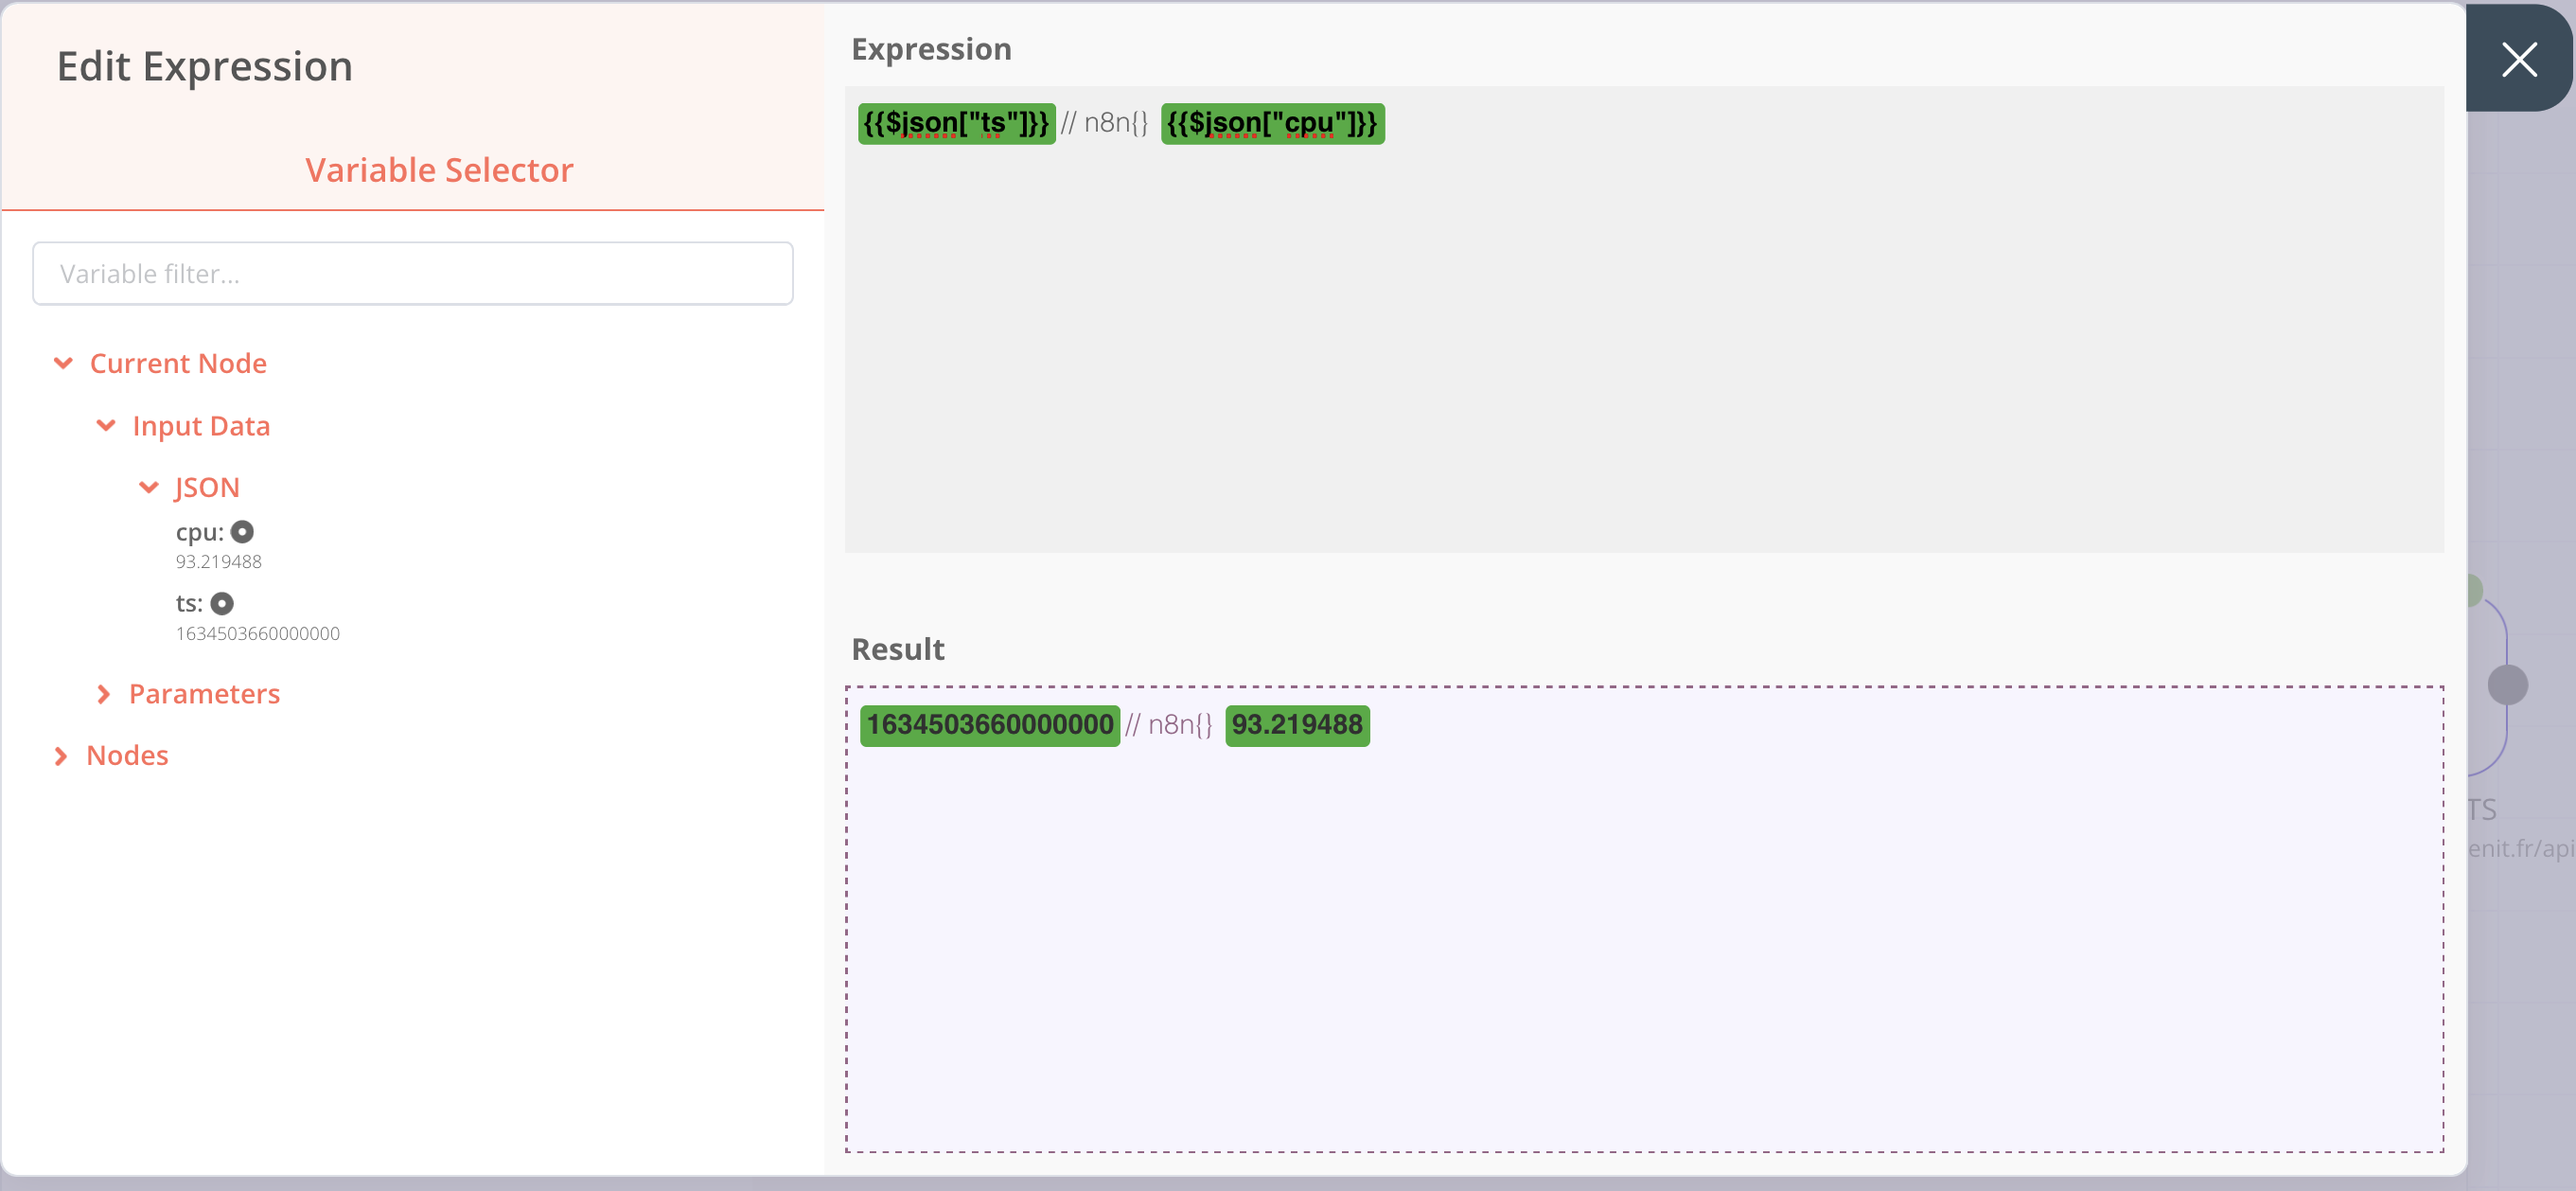
Click on the close button to go back to previous screen and execute the node:
Create an HTTP Request for update purpose
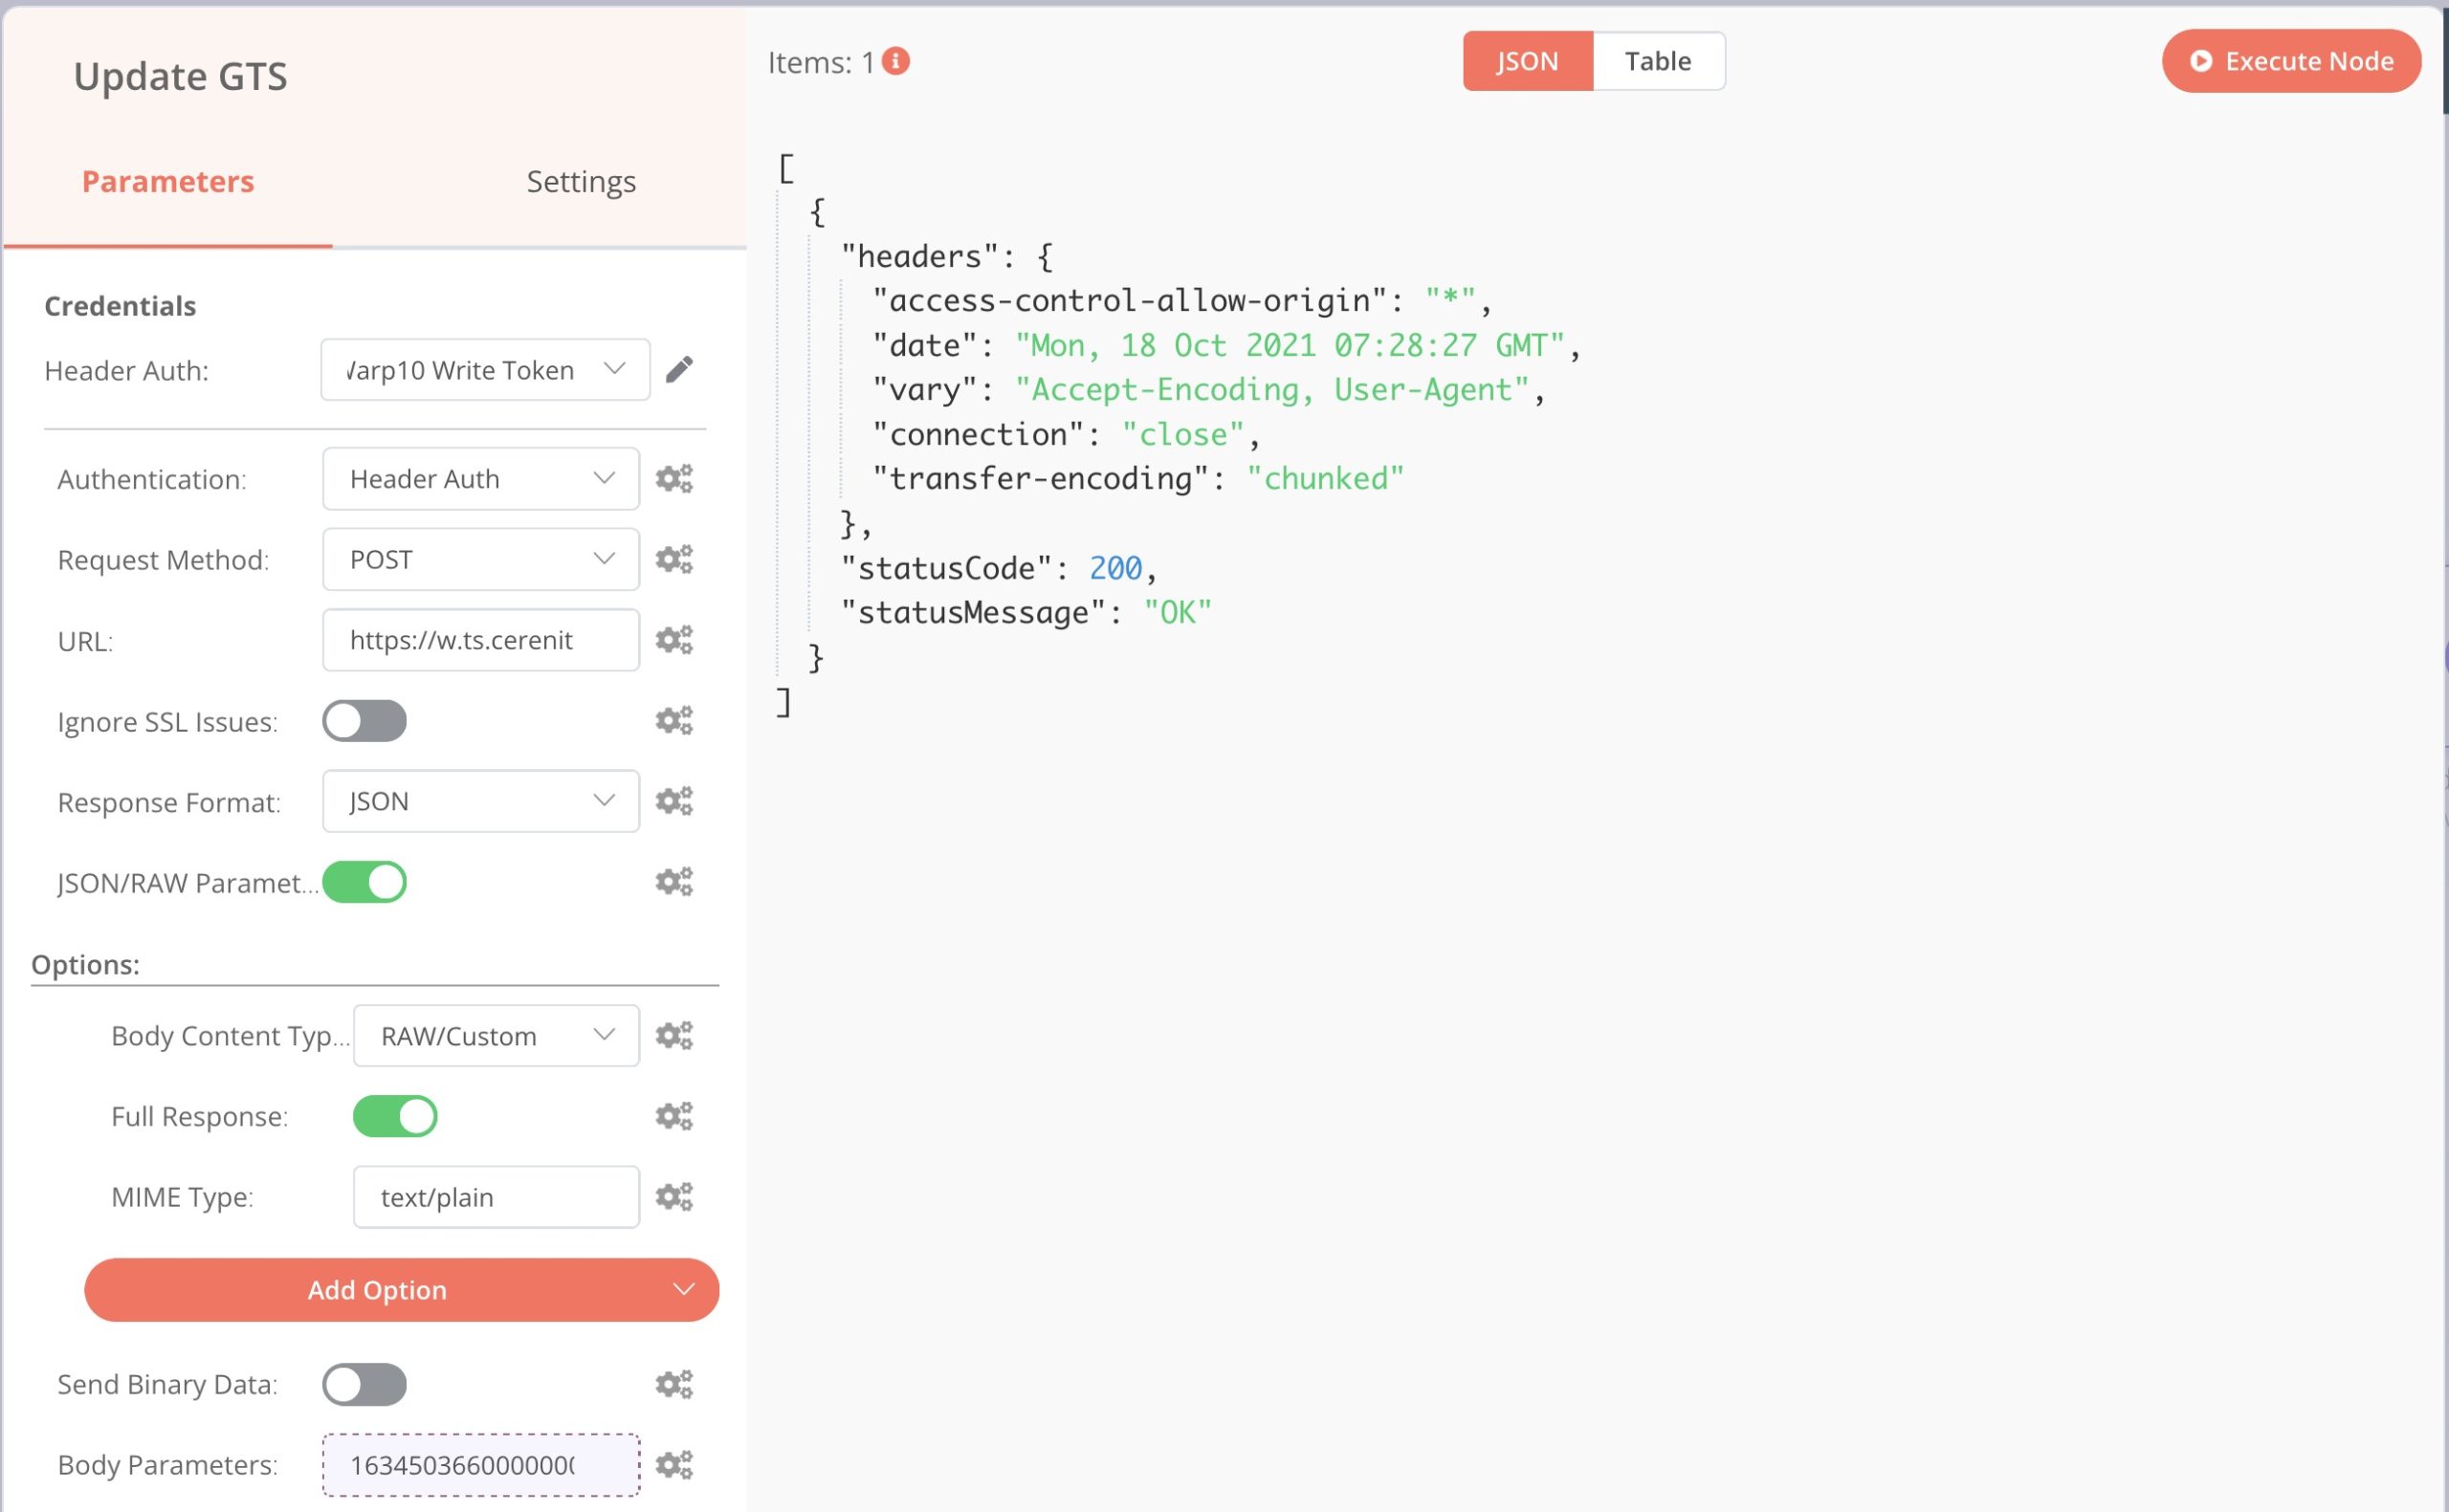
Then, we need to add a new HTTP Request node with the following configuration:
- Parameters:
- Authentication > Header Auth
- Request Method: POST
- URL:
http://url.of.your.warp.10.instance/api/v0/update - Enable JSON/RAW Parameters
- Options:
- Add Option > Mime Type: text/plain
- Add Option > Body Content Type: RAW/Custom
- Add Option > Full Response and enable it to be able to see response from your Warp 10 instance
- Body Parameters > Add Expression > Current Node > Input Data > JSON > gtsinput (columns on the right side should be filled automatically as previously ; click on close icon to go back to previous screen)
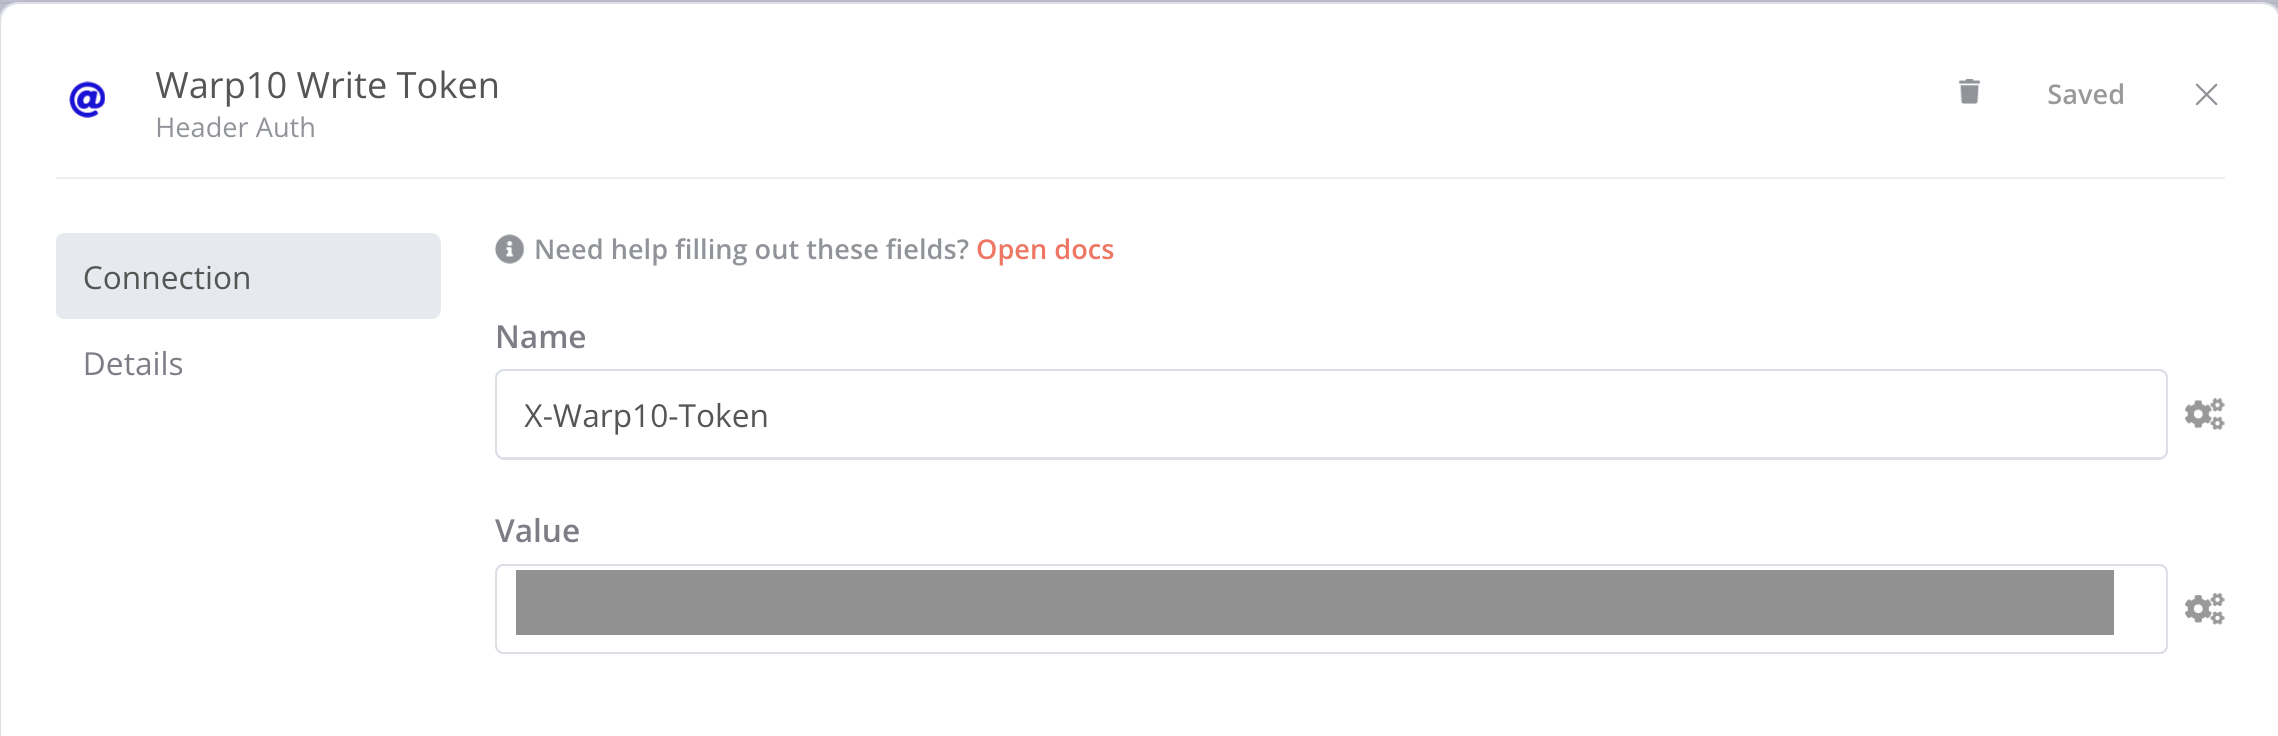
On the top left side, a "Credentials" section appeared after you selected the Header Auth authentication method ; in the drop-down list, select "Create new" and fill the form as below:
- Name: X-Warp10-Token
- Value: your write Warp 10 token
Go back to your HTTP Request node that we can now execute ; we should get the following result:
If we switch to the Warp 10 Studio, we can request the n8n GTS and check its content:
'<readToken>' 'readToken' STORE
[ $readToken 'n8n' {} NOW -100 ] FETCH
And as output:
[
	[{
		"c": "n8n",
		"l": {
			".app": "io.warp10.bootstrap"
		},
		"a": {},
		"la": 0,
		"v": [
			[1634503660000000, 93.219488],
			[1634502790000000, 94.808468],
			[1634501690000000, 93.7751],
			[1634501550000000, 91.741742],
			[1634478300000000, 92.774711]
		]
	}]
]
… with one entry for each workflow execution if the Idle CPU value was over 90%
Takeaways
What we can say:
- It's easy to integrate Warp 10 in a n8n workflow thanks to Warp 10 HTTP API and the n8n HTTP Request Node
- To interact with Warp 10, we must first create an object which will store the WarpScript code or data to be ingested by Warp 10 with the HTTP Request Node
- Even if not detailed in the blog post, data from Warp 10 can be manipulated and transformed and be pushed back to Warp 10 if needed
Workflow was quite basic to quick show the integration. We can imagine more complex and richer workflows:
| This post was originally published in French on the CérénIT blog |
Read more
Create a custom tile for Discovery
Working with Time Series in Spark
All you need to know about interactions between Warp 10 and Python

Founder of CerenIT, consultant in IT Automation & Time Series.
Using Warp 10 since 2019.
— Guest author —