When it comes to prototyping IoT systems, Node-RED is an obvious choice.
This flow-based system originally built by IBM enables you to graphically create a flow that will acquire, process, and store your data. Node-RED has many third-party contributions which make it easy and fast to achieve something.
When your flows become more complex, and you need to process your sensor data in a more advanced way, you need to rely on nodes that call external programs or create your own nodes.
You will then end up writing quite some lines of code outside Node-RED. This code will handle gory details and low-level plumbing issues before you can focus on solving your actual business problem.
To make you more efficient when you work with sensor data inside Node-RED, we have created a special node type that enables you to use the WarpScript language within Node-RED. This type of node will interact with a Warp 10 instance. It will give you access to the full power of WarpScript and to all the data stored in your Warp 10 instance.
| What is WarpScript? |
Installing the WarpScript node type
Assuming you have already installed Node-RED, making the WarpScript node type known to your Node-RED deployment is very simple, all you have to do is to position yourself in the .node-red directory and run npm install @senx/node-red-contrib-warpscript. After you restart your Node-RED instance, you should see a new type of node on the left pane:
![]()
Creating a new Flow with a WarpScript node
To understand how the WarpScript node works, create a blank flow, and drag a WarpScript node to the canvas. Double-click on the node to reveal its properties' pane.
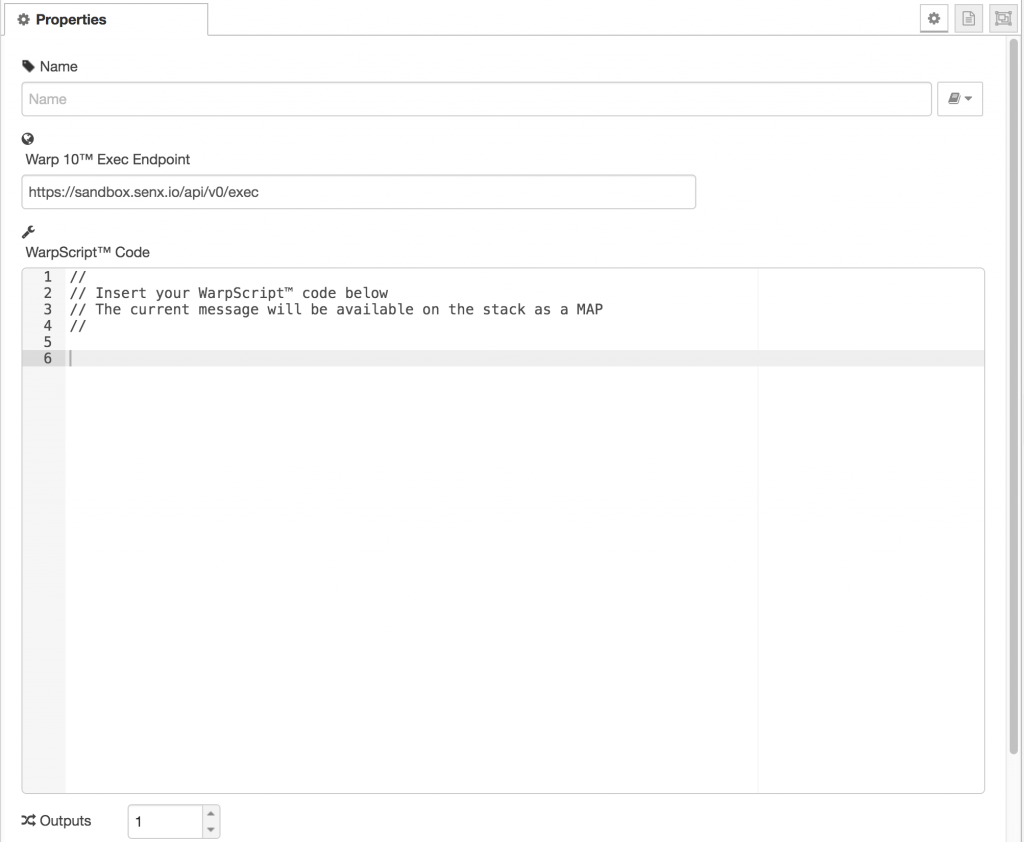
The configuration requires 4 elements. The first one is the name of your node, pick a name that is meaningful in your flow. The second element is the Warp 10 exec endpoint to use to execute your WarpScript code. This is by default the endpoint of the Warp 10 sandbox. Change this to point to your own Warp 10 instance. Or you can leave it to the sandbox for now, so you can immediately test out things. The next element is the WarpScript code you want to execute for each incoming message. We will come back to this later. And lastly, you can set the number of outputs of your node.
Once you have configured all those elements, you can click Done and continue building your flow.
Designing your WarpScript code
The data flowing in Node-RED are called messages. A Node-RED message is a JavaScript object with certain pre-defined fields. Among those fields are payload which contains the actual message content, _msgid which contains a message-id and topic which contains a topic on which the message is transmitted. A message can have any number of other fields.
When a message arrives at a WarpScript node, the JavaScript object is converted to a set of WarpScript function calls. They are prepended to the configured WarpScript code for the node. The complete code is then sent to the configured Warp 10 instance for execution. This means that when the code you wrote is executed, it will find a data structure containing the incoming message as a parameter. You can then store and fiddle with this data structure to extract information from it and act upon what you found.
| Analyze your electrical consumption from your Linky and Warp 10 |
If you intend to emit some messages out of your WarpScript node, your code should leave results on the stack. Those results will then be picked by the WarpScript node and forwarded down the flow on the outputs defined for your node. Each result (stack level) left by your WarpScript code will produce messages. The deeper results will be emitted first, and the top of the stack last.
Each result will produce messages according to the following rules:
If a result is a map, the map will be pushed onto the first output of your node as if it were a valid Node-RED message. You should ensure that it is indeed a valid message by providing at least a payload field.
{ "payload" "This is the message payload" }If a result is a list, the node considers it is a list of lists, where each inner list is a list of messages for the associated output.
[
  [
    { "payload" "First message for output 1" }
    { "payload" "Second message for output 1" }
  ]
  [
    { "payload" "Message for output 2" }
  ]
]
If a result is anything else, it will be put into the payload field of a generated Node-RED message and passed down the flow to the first output of your node.
Saving data in Warp 10
If you are reading data from external sensors and processing them with Node-RED, you might be willing to store those data in Warp 10. This is really easy to do by using the UPDATE function of WarpScript within your code.
All you have to do is create an empty Geo Time Series, name it and label it like you wish, and add the data you want to store to this Geo Time Series.
Once all the data points you want to store are added, call UPDATE with a valid Write Token. Your data will be persisted into the Warp 10 instance you called.
When it comes to prototyping IoT systems, Node-RED is an obvious choice. Share on XA simple example
We will create a simple flow with three nodes. A node to inject some messages into the flow, a WarpScript node to process this data, and a debug node to visualize results.
Configure the inject node with a timestamp payload, a topic set to foo, and a repeat interval of one second.
Configure the debug node to output the complete message object in the debug window.
And configure your WarpScript node with the following code:
// Store the incoming message
'msg' STORE

// Create an empty Geo Time Series
NEWGTS

// Change its class name to 'nodered'
'nodered' RENAME

// And add a 'topic' label with the name of the topic from the incoming message
{ 'topic' $msg 'topic' GET } RELABEL

// Then add a datapoint at the current timestamp with the value in the payload
NOW NaN NaN NaN $msg 'payload' GET ADDVALUE

// Then call UPDATE to store the data in Warp 10
// Replace @WRITE_TOKEN@ with a valid write token
'@WRITE_TOKEN@' UPDATE

// Finally emit a message with a random number
{ 'payload' RAND }
Your flow should look like this in Node-RED:

Once you have deployed your flow, the Node-RED debug window should display random numbers generated by your WarpScript node. Using WarpStudio you can check that the data is well written into your Warp 10 instance.

Take away
We have covered the integration of WarpScript code execution into your Node-RED flows. It is a perfect match given both Node-RED and WarpScript share a data flow execution model.
We would love to know what IoT project you will build with your own Node-RED and Warp 10 instances. Tell us on Twitter or Slack!
Read more
WarpScript for Pythonists
Warp 10 Office Hours #1 Recap
Bite the Bytes, WarpScript bitwise operators review

Co-Founder & Chief Technology Officer