Ever wanted to integrate an amazing data analysis algorithm to WarpScript but has not been developed in Java? Fear not, here is the example of how to integrate Prophet Python API to WarpScript.

Prophet is a procedure for forecasting time series which was developed by Facebook. It uses different seasonality to make its predictions. It is very easy to use, unfortunately, it only has R and Python APIs which makes it difficult to integrate into a Java environment.
Fortunately, Warp 10 has a functionality to integrate external programs: CALL. This blog post demonstrates how to use this functionality on Prophet. If you already developed a program which would be time-consuming to integrate into Java, you should definitively try this approach.
| Read more about how to use WarpScript in Python |
Installing Prophet
First thing first, you should make sure you can call Prophet from Python. There are two documentations on how to install Prophet here and here. The rest of the blog post will consider you're using Python 3, so you should install it for Python 3.
If your installation went well, when you execute this:
import pandas as pd
from prophet import Prophet
df = pd.read_csv("https://raw.githubusercontent.com/facebook/prophet/master/examples/example_wp_log_peyton_manning.csv")
m = Prophet()
m.fit(df)
future = m.make_future_dataframe(periods=365)
forecast = m.predict(future)
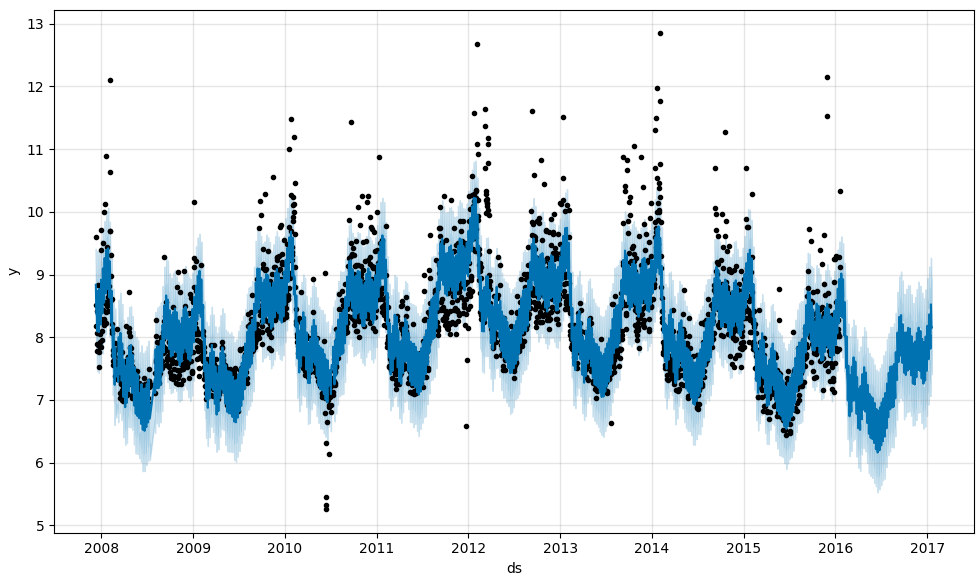
fig1 = m.plot(forecast)
fig1.show()You should see this:
Integrating to Warp 10
The principle of the CALL function is to run a given executable which Warp 10 has access to. This executable must specify how many parallel instances can be run. Then, it must start an infinite loop waiting for input on stdin, doing what it has to do and outputting the result on stdout.
Giving Warp 10 Access to the Executable
Your executable must be located in the warpscript.call.directory, which is, unless changed, the calls directory in your Warp 10 home. Make sure it is executable by the user which runs Warp 10, which is warp10 by default.
Your executable must be a standalone executable, which means you can run it using ./myexecutable.foo. For scripts, such as Python scripts, your best choice is to use a shebang line at the start of your file. For Python 3, you can use:
#!/usr/bin/python3 -uThe -u option is of utmost importance because it disables buffering on stdin, stdout and stderr. Unfortunately, it makes it complicated to use the nice #!/usr/bin/env shebang.
Specifying the Number of Instances
The first thing your executable must do is to output the number of parallel instances which can be spawned. A simple print(16)will do. This means there can be up to 16 instances of this executable running in parallel. In other words, if 16 WarpScript are currently executing this Python script, the 17th call will have to wait for one of those 16 to end.
This number is limited by the warpscript.call.maxcapacity configuration, which defaults to 1. So if you really want to be able to run 16 Prophet procedures in parallel, you have to increase that configuration.
Setting the Infinite Loop
The role of the infinite loop is to wait for an input and output the result for WarpScript to get it back. Inputs and outputs are url-encoded UTF-8 strings ended by a newline.
The easiest way to exchange data between WarpScript and Python is to use pickle with the WarpScript functions ->PICKLE and PICKLE->. Pickeling produces bytes so, in order to convert to a string, we must base64 encode it. Here is the resulting "onion transformation":
Although it can look a bit intimidating, this data transformation is easily done in Python (and also WarpScript as you will see):
# Read input
line = sys.stdin.readline().strip()
args = pickle.loads(b64decode(unquote(line)))
Now that we know how to transfer data between WarpScript and the Python script, we must define exactly what the input data is composed of. Prophet needs ticks and values for the fitted time series as well as ticks to make predictions for.
We simply define the input as a Map/dictionary with three entries, all the value being Lists/arrays:
ticks: Long microsecond timestamps.values: Numeric values.ticks_forecast: Long microsecond timestamps, optional.
The ticks defining when to make predictions it optional because Prophet can be used to fit in-sample. That means it can show how it models the data on the same data it used to learn its parameters. It can be used for anomaly detection for instance, singling out values which are far from what Prophet modeled.
Pickle already built the arrays, all we have to do is convert microsecond timestamps to datetimes and handle the optional forecast ticks:
# Get the timestamps and convert them to datetimes
timestamps = args["ticks"]
datetimes = list(map(lambda x: datetime.utcfromtimestamp(x / 1e6), timestamps))

# Get the values
values = args["values"]

# Get the datetimes to know when to forecast
try:
  future_ts = args["ticks_forecast"]
  future_dt = list(map(lambda x: datetime.utcfromtimestamp(x / 1e6), future_ts))
except KeyError:
  future_ts = timestamps
  future_dt = datetimes # No future dates to predict, use same datetimes for in-sample prediction
The 3 variables datetimes, values and future_dt must be converted to a DataFrame for Prophet. Then, the fit/predict magic can happen:
# Format the data according to prophet format
df = pd.DataFrame(data={"ds": datetimes, "y": values})
future = pd.DataFrame(data={"ds": future_dt})

# Instantiate and fit
m = Prophet()
m.fit(df)

# Do the forecasting for the specified dates
forecast = m.predict(future)
Now that Prophet made a forecast, we have to send back the data to WarpScript. In the same way, we defined a pickle-compatible input, we define an output which is a Map/dictionary of 4 entries, all the value being Lists/arrays:
ticks_forecast: same as input.values_forecast: predicted Numeric values.values_forecast_lower: Numeric lower bounds of the uncertainty intervalsvalues_forecast_upper: Numeric upper bounds of the uncertainty intervals
# Build output
output = {
  'ticks_forecast': list(map(lambda dt: (dt - dt(1970, 1, 1)).total_seconds() * 1e6, forecast['ds'].tolist())),
  'values_forecast': forecast['yhat'].tolist(),
  'values_forecast_lower': forecast['yhat_lower'].tolist(),
  'values_forecast_upper': forecast['yhat_upper'].tolist(),
}
Finally, we have to apply the inverse transformation on the data to send it back to WarpScript.
# Output result
print(quote(b64encode(pickle.dumps(output))))
Managing Outputs
We did everything according to the book, so should be OK, right? Well, not really, Prophet outputs some information on the progress of the fitting on stdin. It messes with how CALL communicates with the executable, and there is no option to tell Prophet not to output anything.
Stack Overflow to the rescue, there is a solution to deep suppress any output from native libraries. With that solution, adding a
with suppress_stdout_stderr():In the loop, while keeping our print outside will solve this problem.
Managing Errors
What happens if our Python code fails? Can we send the cause of the error to WarpScript? Indeed, by sending a line beginning with a space, CALL will know that this is an error message. Why a space? Remember that the Strings are URL-encoded between WarpScript and the executable, so it cannot contain a space because they are encoded as %20. You still have to URL-encode the error message though.
The final touch to our Python script is to add a try/except in the infinite loop to catch all Exceptions and use the traceback module to get the origin of the error:
except Exception as err:
  print(" " + quote(traceback.format_exc()))
Wrapping it Up
We studied each part of the Python script to expose Prophet to WarpScript, but some parts were omitted for clarity. Here is the complete script if you want to test or use Prophet on your Warp 10 instance.
Remember you have to put this file in you calls directory for Warp 10 to expose it through CALL.
Calling from WarpScript
The Python executable is ready to be used in WarpScript, we now have to take care of the WarpScript part. What we want to do is generate the prediction for a single GTS.
First, we have to convert the GTS to the Map format we described earlier which is the input of the executable. For the forecast ticks, we arbitrarily choose all the input ticks and 52 weeks after. We do that by merging the ticks from the input GTS and the input GTS shifted by 52 weeks in the future.
// Store the GTS
'series' STORE

// Convert the GTS of the stack to prophet.py input
{
  'ticks' $series TICKLIST // Must be in microseconds for prophet.py
  'values' $series VALUES
  'ticks_forecast' [ $series DUP 52 w TIMESHIFT ] TICKS
}
Next, we apply the "onion transformation", call the executable prophet.py, and apply the inverse transformation to get the output back. URL-encoding is done by CALL, so there is no need to do it yourself.
->PICKLE
->B64

'prophet.py' CALL

B64->
PICKLE->

'prophet_forecast' STORE
Last, we have to convert the executable output to GTSs. We extract the ticks and for each entry in the Map we create a GTS with these ticks and the values in the entry. We rename and relabel the newly created GTS for a nice output.
// For each remaining entry, build a GTS using ticks_forecast.
$prophet_forecast
<%
  [ 'key' 'value' ] STORE
  // Make the prediction GTS
  $ticks_forecast [] [] [] $value MAKEGTS
  // Rename and relabel
  [ $series NAME $key 7 SUBSTRING ] '.' JOIN RENAME
  $series LABELS RELABEL
%>
FOREACH

$series
And voila, you now have integrated Prophet in WarpScript. Sure, this is limited and Prophet offers more but all the base principles are here. Now, time to check those predictions!
Testing the predictions
Prophet quickstart uses a dataset of page views of Peyton Manning on Wikipedia. We will use the same data to compare the results we got at the top of this post. You can find the code to apply Prophet on this data in WarpScript here.
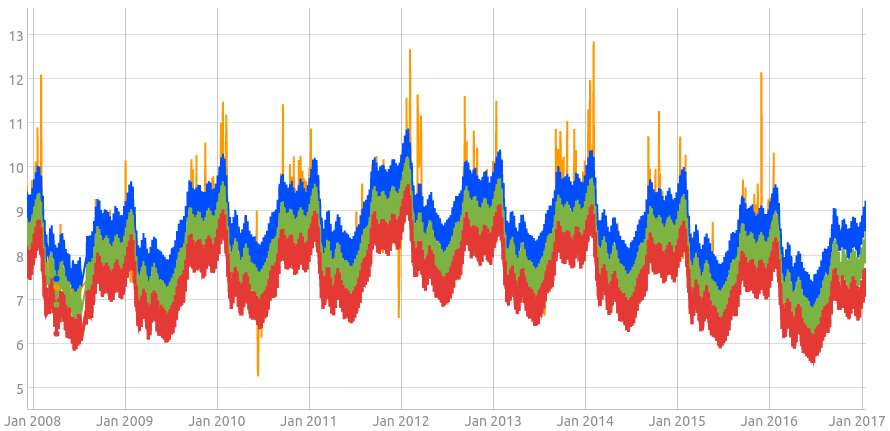
This looks very similar to the first graph outputted by Python when we tested Prophet. See also that the in-sample prediction can reveal strange occurrences like drops in number of visits or sharp increases. In the end, it's up to you what you want to do with Prophet or any CALL integration. The main idea is that WarpScript is both powerful and versatile, allowing you to do complex analysis but also to integrate already developed programs.
Takeaways
If you already developed a program which fits your precise need for data analysis, you don't have to rewrite it if you want to switch to WarpScript, just integrate it.
If you need to predict the future of your time series, you can use this free Prophet integration or our private extension.
Read more
The Py4J plugin for Warp 10
Discovery Explorer - The dashboards server
Warp 10 and the Ethereum blockchain

WarpScript™ Doctor