Discover how to use WarpScript in a Jupyter notebook for doing data science on time series data.
In this blog post, we'll talk about how to use WarpScript in a Jupyter notebook. WarpScript is the data programming language provided by the Warp 10 platform. An introduction to WarpScript is available on this link.
- 1. Using POST requests
- Example
- Pros
- Cons
- 2. Using the Warp10-Jupyter extension
- Description
- Example
- What happened here ?
- Arguments
- How are objects converted between Java and Python?
- 3. Conversions between Geo Time Series and DataFrame
- From GTS to DataFrame
- From DataFrame to GTS
- Conclusion
First, we review rapidly the method that consists in sending HTTP POST requests. Then, we explain the principled method to use WarpScript in Jupyter. This method allows going back and forth between WarpScript and Jupyter, while keeping the state of the WarpScript stack. Finally, we will show how to convert efficiently a list of Geo Time Series (GTS) into a Pandas DataFrame.
In what follows, we use Python 3.6.
1. Using POST requests
The first way to use WarpScript in a notebook is by hitting the /exec endpoint of a Warp 10 platform.
Example
Let us assume that you have a WarpScript file named tmp.mc2. If not, then you can write one within a Jupyter notebook using the magic %%writefile. For example, in the following cell, we create a GTS with the function MAKEGTS:

Then, in the next cell, we send it via an HTTP POST request.
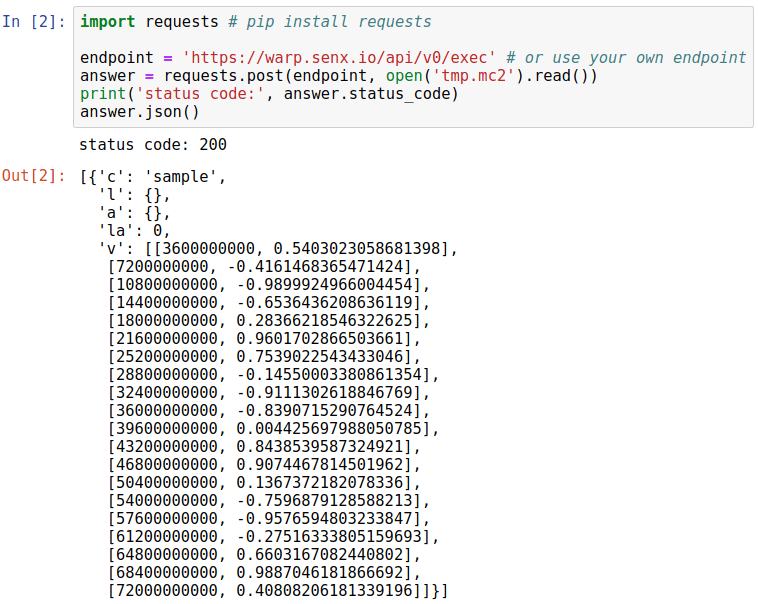
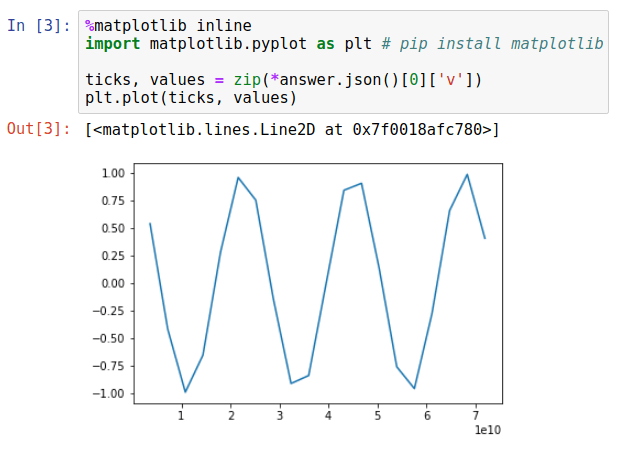
Finally, the result of the WarpScript can be used in the notebook by parsing the JSON accordingly. For instance, let us plot that.
Pros
- It does not require any particular configuration of the Warp 10 platform. You just hit its /exec endpoint, like with any other WarpScript.
Cons
- You need to deserialize the WarpScript stack from JSON and parse it to assign the result to a Python variable.
- Should you need to use a Python variable on the WarpScript stack you have to recreate it using WarpScript code.
- Once the cell is executed, the WarpScript stack is not kept in memory.
The next method alleviates these cons. It allows accessing WarpScript objects that are on the stack directly from Python. Hence, it allows going back and forth between the Python interpreter and the WarpScript stack.
2. Using the Warp10-Jupyter extension
You can install this Jupyter extension with pip install warp10-jupyter.
Description
This extension contains the cell magic %%warpscript. It works by asking a Warp 10 platform to create a new WarpScript™ execution environment (a stack) with which the notebook will interact.
It does this by connecting to a gateway launched by the Py4J library (e.g. the same library used by pySpark). This gateway can either be started by a Warp 10 platform (with the Py4J plugin), or by the Warp10-Jupyter extension itself.
If connecting to the gateway of a Warp 10 platform, note that the FETCH, FIND, and FINDSTATS functions won’t work, unless the property egress.clients.expose of the Warp 10 platform is set to true.
To use a local gateway (i.e. that is not connected to a Warp10 platform), you can use the syntax %%warpscript --local (release 0.4+ of the extension).
Example
To enable this magic in your notebook, you can do:

Then, let us try a basic WarpScript.

What happened here ?
The python interpreter has started a connection with a Warp 10 platform, which by default is a located at localhost:25333. Then, a new WarpScript stack has been created. It is accessible in this notebook. For example, the magic %whos acknowledges it

We can then interact with the stack. For example, we can use the pop method to extract the top of the stack.

We can use peek() or get(0) to retrieve the list that was left on top of the stack. In the next cells, we retrieve this list to see that we can modify it in Python.

Similarly, in Python, we can use variables that were stored by the stack by using load().

Arguments
This cell magic has multiple optional arguments. You can invoke its doc with %%warpscript?.
How are objects converted between Java and Python?
Under the hood, this extension uses the Py4J protocol and its automatic conversions, which are supported for basic classes e.g. primitive types, lists, sets, maps, iterators and byte arrays. You can also define your own conversions, but we won't detail that in this blog post. For more information, see here.
Therefore, GTS are (obviously) not automatically converted from the WarpScript stack to the Python interpreter. This is the subject of the next section.
3. Conversions between Geo Time Series and DataFrame
Let us start a new notebook. For convenience, we will use the alias %%w for %%warpscript.

Also, we will store the WarpScript stack in the python variable swith the inline argument --stack / -s.
From GTS to DataFrame
To convert a list of GTS into a Pandas DataFrame, we will first store its content into a map of lists and pickle it on the stack using ->PICKLE. The result is an array of bytes that is converted efficiently from Java to Python by Py4J. Then, we unpickle it and feed a new DataFrame with it.
The Java part is done by the macro ListGTStoPickledDict that can be obtained here. This macro takes as arguments a list of GTS, followed by a boolean indicating whether to keep the labels or not.
Let us show a quick example.
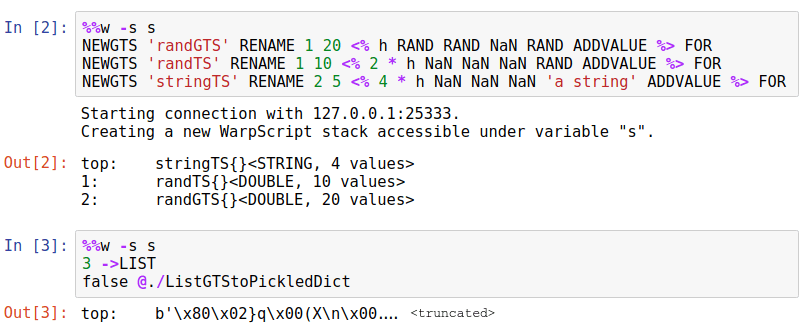
Then, we do the Python part of the conversion, as in the cell that follows.

| timestamps | randGTS.lat | randGTS.lon | randGTS | randTS | stringTS | |
|---|---|---|---|---|---|---|
| 0 | 3600000000 | 0.039877 | 0.898650 | 0.340894 | NaN | NaN |
| 1 | 7200000000 | 0.253846 | 0.460449 | 0.359312 | 0.422285 | NaN |
| 2 | 10800000000 | 0.290711 | 0.682014 | 0.863143 | NaN | NaN |
| 3 | 14400000000 | 0.411854 | 0.902713 | 0.001440 | 0.822429 | NaN |
| 4 | 18000000000 | 0.509833 | 0.261209 | 0.235570 | NaN | NaN |
| 5 | 21600000000 | 0.386919 | 0.225772 | 0.006609 | 0.279210 | NaN |
| 6 | 25200000000 | 0.334531 | 0.559515 | 0.638833 | NaN | NaN |
| 7 | 28800000000 | 0.068498 | 0.073961 | 0.926505 | 0.415326 | a string |
| 8 | 32400000000 | 0.345870 | 0.765727 | 0.021555 | NaN | NaN |
| 9 | 36000000000 | 0.794293 | 0.546248 | 0.712494 | 0.481021 | NaN |
| 10 | 39600000000 | 0.521795 | 0.559817 | 0.579806 | NaN | NaN |
| 11 | 43200000000 | 0.606693 | 0.609749 | 0.510658 | 0.325373 | a string |
| 12 | 46800000000 | 0.062864 | 0.886699 | 0.639813 | NaN | NaN |
| 13 | 50400000000 | 0.800582 | 0.215258 | 0.009598 | 0.145950 | NaN |
| 14 | 54000000000 | 0.191501 | 0.564057 | 0.315020 | NaN | NaN |
| 15 | 57600000000 | 0.272096 | 0.807898 | 0.921799 | 0.974948 | a string |
| 16 | 61200000000 | 0.207882 | 0.925999 | 0.177088 | NaN | NaN |
| 17 | 64800000000 | 0.118950 | 0.006078 | 0.062828 | 0.378946 | NaN |
| 18 | 68400000000 | 0.806578 | 0.994662 | 0.240190 | NaN | NaN |
| 19 | 72000000000 | 0.701807 | 0.357126 | 0.196903 | 0.837751 | a string |
It is important to note that GTS of a list can have different ticks, hence the macro ListGTStoPickledDict also fills missing ticks with NaN. Indeed, this is just an example but for real cases it is good practice to align the ticks of the GTS beforehand by using WarpScript (for example, see BUCKETIZE or FILL).
From DataFrame to GTS
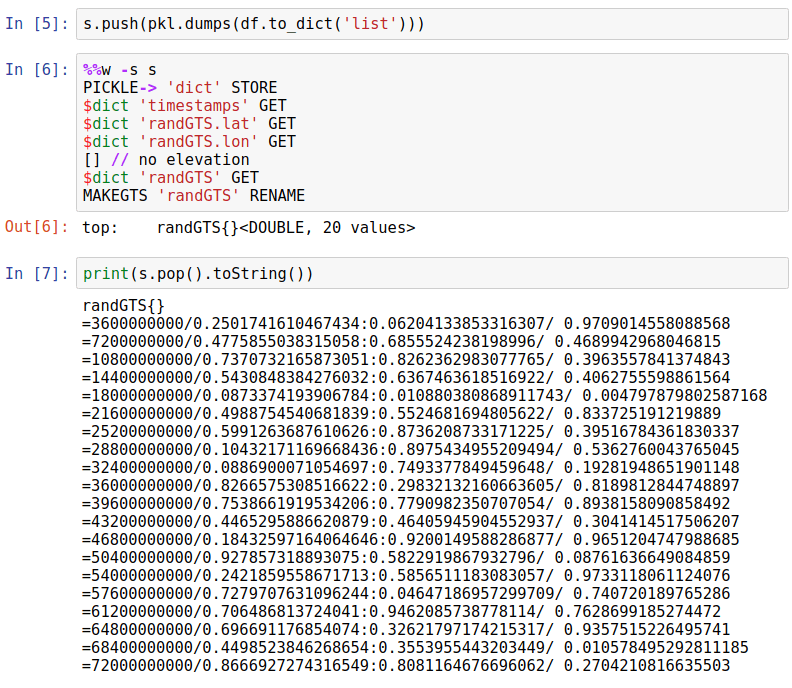
The inverse conversion can be done similarly. To illustrate this, let us revert randGTS into a GTS.
Conclusion
We have seen that we can use WarpScript in Jupyter and even interact with the stack. We presented the Warp10-Jupyter extension with some short examples. The source code is available at https://github.com/senx/warp10-jupyter.
Read more
Runners dynamic scheduling
W. Files Conspiracy vol. 2: Spy drones over UDP
Discovery Explorer - The dashboards server

Machine Learning Engineer