Warp 10 3.0 introduced the standalone+ version, using FoundationDB as backend. This article presents how to deploy and configure a Standalone+ instance.
The recent 3.0 release of Warp 10 introduced a major change by the shift to using FoundationDB as a third-party backend instead of HBase.
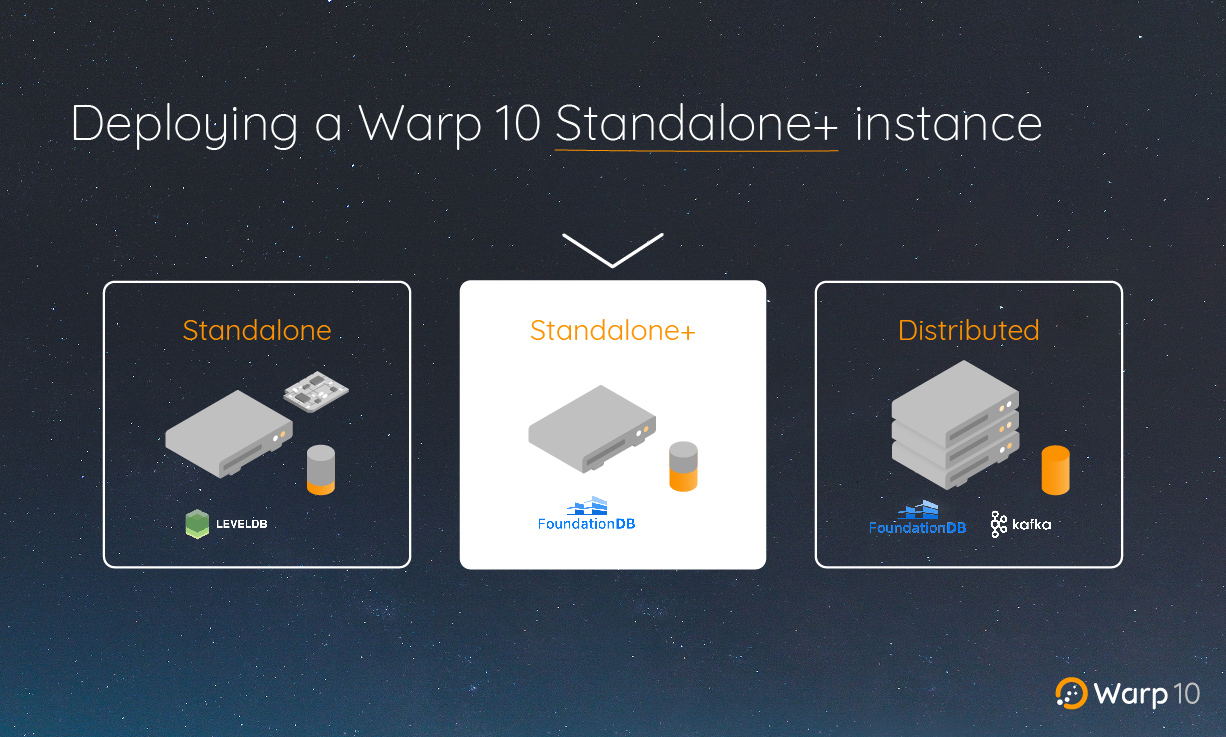
As part of this major change impacting the distributed version of Warp 10, a new deployment mode was introduced that is a middle ground between the standalone version backed by LevelDB, and the distributed version. This new deployment mode is called standalone+ and is, in short, a standalone Warp 10 instance using FoundationDB as its backend instead of LevelDB.
This deployment mode allows to start small with the possibility to migrate to a distributed version of Warp 10 without having to migrate any data during the migration.
This blog post will walk you through the deployment and configuration of a standalone+ instance of Warp 10.
| Standalone, standalone+, or distributed? Read this article to find out which version of Warp 10 suits your needs. |
Deploying FoundationDB
The first thing you need to do when planning a standalone+ deployment is to install FoundationDB. This is straightforward on Linux, simply install the foundationdb-clients and foundationdb-server packages from a FoundationDB release. Note that Warp 10 3.0 supports FoundationDB 7.1, so choose a release 7.1.x from the release page. At the time of writing, release 7.1.33 has an issue with the packages provided for Ubuntu, so you may pick 7.1.31 instead to spare you some headaches.
The foundationdb-server package should be deployed on all nodes running FoundationDB and the foundationdb-clients one on nodes running FoundationDB and the node running the Warp 10 instance.
The configuration of FoundationDB as a cluster of multiple machines is not covered in this article, we assume you have a working deployment of FoundationDB at this point.
Once your FoundationDB instance is up and running, you need to initialize the database which will store the data for Warp 10. This is done by issuing the following statement in the fdbcli utility:
configure new single ssd-redwood-1-experimental
The recommended storage engine for Warp 10 is ssd-redwood-1-experimental as it provides prefix compression which lowers the storage footprint of data. Note that this engine is no longer considered experimental despite experimental being part of its name, this suffix should be dropped in the next release as Snowflake has now tested it extensively.
Of course, if your FoundationDB deployment supports data replication you should replace single with whatever replication level you want to use.
Now that the FoundationDB layer is up and running, the next step is to initialize the Warp 10 instance.
Initializing a Warp 10 standalone+ instance
Download a .tar.gz from a recent 3.0 release of Warp 10 and extract its content in the directory of your choice. We will refer to this directory as WARP10_HOME in the rest of this article. You can then run the following command:
WARP10_HOME/bin/warp10.sh init standalone+
This will initialize the Warp 10 instance and create configuration files suitable for a standalone+ instance.
The only thing left to do is to copy the FoundationDB /etc/foundationdb/fdb.cluster file from one of your FoundationDB node to WARP10_HOME/etc/fdb.cluster. Make sure the file can be read and written by the user running Warp 10.
Once that file has been copied, you can start your Warp 10 instance using:
WARP10_HOME/bin/warp10.sh start
That is all there is to it!
A note on multi-tenancy
A single FoundationDB database can store data from multiple Warp 10 instances, this is called multi-tenancy. In order to support multi-tenancy, the data from each Warp 10 instance must be clearly separated. This is done with the use of FoundationDB tenants. If you intend to support multiple tenants, you need to configure FoundationDB to require tenants, this will ensure that no Warp 10 instance with no tenant defined can store data in FoundationDB. This is simply done via the following command run in fdbcli:
configure tenant_mode=required_experimental
You then need to create a tenant per Warp 10 instance. Again, in fdbcli issue the following command:
createtenant name_of_tenant
You then need to configure Warp 10 with the name of that tenant. Add the following configuration to WARP10_HOME/etc/conf.d/99-init.conf:
directory.fdb.tenant = name_of_tenant
store.fdb.tenant = ${directory.fdb.tenant}
egress.fdb.tenant = ${directory.fdb.tenant}
Then restart the Warp 10 instance using:
WARP10_HOME/bin/warp10.sh restart
You can now safely deploy other Warp 10 instances using the same FoundationDB database simply by creating and configuring a dedicated tenant for each one.
Testing your instance
Now that your instance is running, you can test it. For that, you will need read and write tokens. Demo tokens can easily be generated using the following command:
WARP10_HOME/bin/warp10.sh tokengen WARP10_HOME/tokens/demo-tokengen.mc2
The output of this command will be similar to:
[{
  "ident" : "ffbc7d148be0b36c",
  "id" : "DemoWriteToken",
  "token" : "....."
},{
  "ident" : "47c32ff41cd66fa9",
  "id" : "DemoReadToken",
  "token" : "....."
}]
The read and write tokens are the values associated with the key token in both JSON maps. We will refer to those tokens as READ and WRITE.
To test writing data to your Warp 10 instance, issue the following command:
curl -H 'X-Warp10-Token: WRITE' --data-binary '0// test{} 42' http://127.0.0.1:8080/api/v0/update
And to read the data point you just wrote, run:
curl -g 'http://127.0.0.1:8080/api/v0/fetch?token=READ&selector=test{}&now=0&count=1'
If you successfully saw the value 42 at timestamp 0 of GTS test{} your deployment of Warp 10 standalone+ was successful, congratulations!
A note on performance
The configuration created by WARP10_HOME/bin/warp10.sh init is rather conservative in terms of resources and limits. You may want to adjust some limits to your needs. You can do so by setting configuration keys in WARP10_HOME/etc/conf.d/99-init.conf and by changing environment variables in WARP10_HOME/etc/warp10-env.sh.
Among the things you may want to change is the configuration of parallel scanners which greatly speed up data retrieval. The following configuration enables parallel scanners with reasonable defaults:
##
## Parallel scanners
##
egress.fdb.parallelscanners.poolsize = 64
egress.fdb.parallelscanners.maxinflightperrequest = 4
egress.fdb.parallelscanners.min.gts.perscanner = 16
egress.fdb.parallelscanners.max.parallel.scanners = 16
These values will allow fetch requests to be divided in up to 16 groups of GTS with up to 4 of them being processed in parallel. Depending on your usage pattern you may want to tweak these values, don’t hesitate to experiment.
Conclusion
This blog post walked you through the deployment of a standalone+ version of Warp 10 using FoundationDB as the storage backend. As you noticed, the process is very simple and in a few steps, you can have an instance up and running with a lot of room to grow your usage.
Of course, it would be delusional to expect to cover all aspects of the Warp 10 configuration and usage in a single blog post, so we invite you to join the Warp 10 Lounge to interact with other members of the Warp 10 community to learn more about this technology. We also love to learn what you are working on, so please share what you do.
Read more
Introducing BigDecimal within WarpScript
Introducing Warp 10 3.0!
How to migrate to Warp 10 3.0?

Co-Founder & Chief Technology Officer