Migrate from Warp 10 2.x to Warp 10 3.0, from configurations to systemd unit update, explained step by step.
Today I will migrate a Warp 10 standalone server from 2.11 to 3.0beta, and explain the migration step by step.
Step 1: download
Beta releases are available on GitHub, directly on this page.
Choose the tar.gz, and decompress it in /tmp/:
cd /tmp
wget "https://github.com/senx/warp10-platform/releases/download/3.0.0-beta3/warp10-3.0.0-beta3.tar.gz"
tar -xzf warp10-3.0.0-beta3.tar.gz
cd warp10-3.0.0-beta3
Step 2: pick up what you need
In 3.x, the launcher script is now named warp10.sh, and you will override it each time you update Warp 10. Environment customization is now in etc/warp10-env.sh
The systemd launcher has the same name, so keep the old one until the end. Both versions must remain easy to start during the migration process.
cp bin/warp10-3.0.0-beta3.jar bin/warp10.sh /opt/warp10/bin
cp bin/warp10.service /opt/warp10/bin/warp10-3.x.service
cp etc/warp10-env.sh /opt/warp10/etc
cp -r tokens/ /opt/warp10/
Step 3: Customize warp10-env.sh
With Warp 10 3.0, bin/warp10.sh does not contain configurations anymore, but sources etc/warp10-env.sh. So, you need to customize it, at least the maximum amount of RAM. Look at your previous warp10-standalone.sh and copy the values into etc/warp10-env.sh
grep "WARP10_HEAP.*=" /opt/warp10/bin/warp10-standalone.shAlso, look at JAVA_HOME:
grep "JAVA_HOME=" /opt/warp10/bin/warp10-standalone.shThen, edit /opt/warp10/etc/warp10-env.sh with your favorite editor, and set the same configurations, for example:
##
## Initial and maximum RAM
##
WARP10_HEAP=4g
WARP10_HEAP_MAX=4g


## JAVA_HOME is automatically detected by warp10.sh
## However, on a system with several version of java, you may want to specify the path explicitly.
## JAVA_HOME/bin/java or JAVA_HOME/jre/bin/java must exist.
#JAVA_HOME=/opt/java8
JAVA_HOME=/usr/lib/jvm/java-8-openjdk
JAVA_OPTS=
Step 4: Inspect your WarpScripts
As Warp 10 3.0 come with a few breaking changes, you need to inspect your macros, runners, and discovery dashboards. All the .mc2 files.
So, I will use the audit tool already presented in this article.
cd /tmp
mkdir audit3x
cd audit3x
cp /tmp/warp10-3.0.0-beta3/bin/warp10-3.0.0-beta3.jar /tmp/audit3x
Copy the audit jar in the same directory. /tmp/audit3x should contain both warp10-3.0.0-beta0.jar and warp10-ext-audit-1.0.2.jar. Login as warp10 user to be sure to access all the /opt/warp10 files, and run the audit command:
sudo su warp10
cd /opt/warp10/
java -cp /tmp/audit3x/warp10-ext-audit-1.0.2.jar:/tmp/audit3x/warp10-3.0.0-beta3.jar:"/opt/warp10/lib/*" -Dwarp10.config="$(find etc/conf.d -not -path '*/\.*' -name '*.conf' | sort | tr '\n' ' ')" io.warp10.ext.audit.AuditWarpScriptExtension audit3x ./
At this step, you may have errors with old extensions that might not be compatible with Warp 10 3.x jar file. Forecast extension, Arrow extension, for example. Contact us, we are in the process to update them all.
If everything goes well, you should have a nice markdown output that you can put in a temporary file, copy to your computer, then open with your favorite viewer (VSCode markdown preview works well too (ctrl+shift+V)).
java -cp /tmp/audit3x/warp10-ext-audit-1.0.2.jar:/tmp/audit3x/warp10-3.0.0-beta3.jar:"/opt/warp10/lib/*" -Dwarp10.config="$(find etc/conf.d -not -path '*/\.*' -name '*.conf' | sort | tr '\n' ' ')" io.warp10.ext.audit.AuditWarpScriptExtension audit3x ./ > /tmp/report.mdStep 5: update your configuration
The first part of the report concerns your configurations. Just follow the guide!
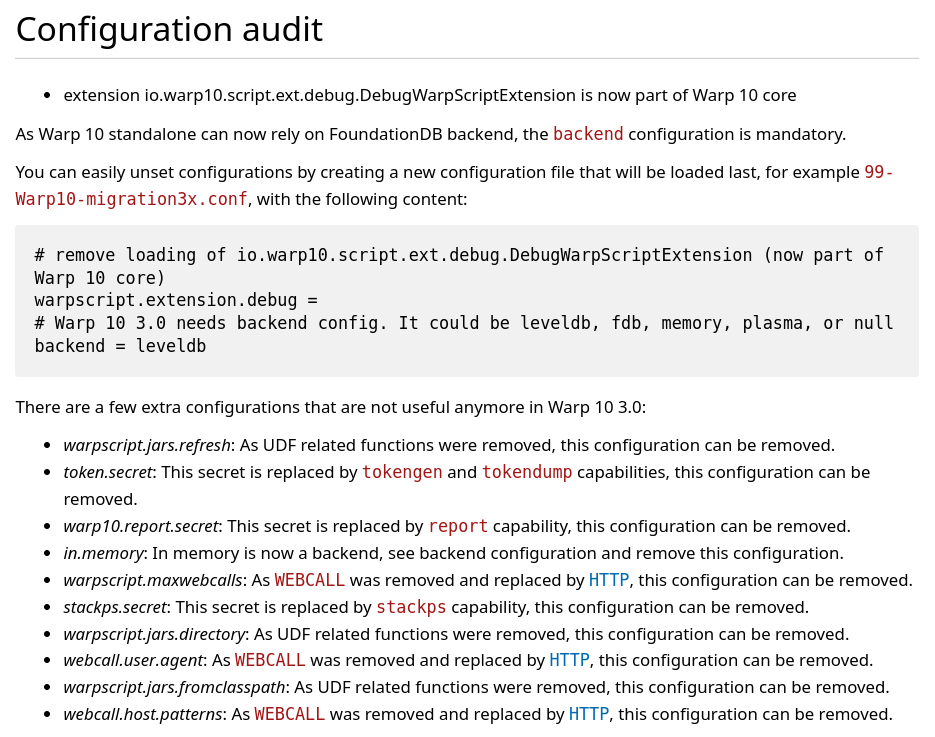
Edit /opt/warp10/etc/conf.d/99-Warp10-migration3x.conf , and copy-paste the suggestion.
At this step, Warp 10 3.0 should be able to start (if there is no extension problem), but your WarpScript may fail. Time for the first service interruption shut down Warp 10 2.x, and manually start Warp 10 3.0. If you set up systemd service in the past, you must use it (if you stop Warp 10 2.x manually, systemd will try to relaunch it).
sudo systemctl stop warp10.service
sudo su warp10
/opt/warp10/bin/warp10.sh start
On this server, I had a very old HFile store plugin. So I got an error while starting Warp10 3.0 beta0:
Exception in thread "main" java.lang.NoClassDefFoundError: org/apache/hadoop/hbase/Cell
	at io.senx.plugins.hfstore.HFStoreWarp10Plugin.init(HFStoreWarp10Plugin.java:34)
Once this extension was updated, Warp 10 3.0 did start. It is time to fix the WarpScripts. Stop Warp 10 3.0 for the moment, and start Warp 10 2.x again to minimize downtime.
/opt/warp10/bin/warp10.sh stop
sudo systemctl start warp10.service
Step 6: Learn capabilities
For security reasons, Warp 10 3.0 completely removed simple authentication, or plain text secrets. So you have to generate tokens with capabilities. Look at the audit report, and list all the capabilities-related errors. For example:


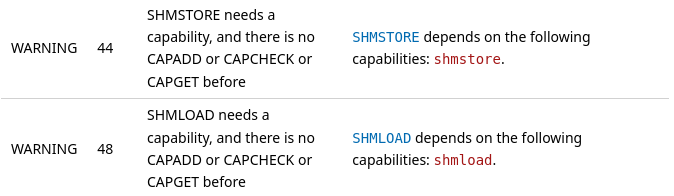
In this example, I need rexec, debug, shmload, shmstore capabilities. Up to the documentation, you will see that capabilities can just be an empty string, or can be something else (a regular expression for rexec). Generate a token with the missing capabilities (or several tokens when needed to make fine-grain authorizations in your company). Create /opt/warp10/tokens/generateCapabilities.mc2:
'00000000-0000-0000-0000-000000000000' 'uuid' STORE
{
  'id' 'TokenRead'
  'type' 'READ'
  'application' 'noapp'
  'owner'  $uuid
  'issuance' 0
  'expiry' [ 2050 ] TSELEMENTS-> MSTU /
  'labels' { }
  'attributes' {
      '.cap:rexec'    '.*warp.*'  // allow domains that contains warp
      '.cap:mutex'    ''
      '.cap:shmstore' ''
      '.cap:shmload'  ''
      '.cap:debug'    ''
   }
  'owners' [ $uuid ]
  'producers' [ $uuid ]
  'applications' [ 'noapp' ]
} TOKENGEN

JSONPRETTY
Then, generate the token with tokengen (command line, no need to activate tokengen extension):
$ /opt/warp10/bin/warp10.sh tokengen /opt/warp10/tokens/generateCapabilities.mc2
[{
  "ident" : "82f6efc32c8a86b3",
  "id" : "TokenRead",
  "token" : "JYGeKhcsad_nAEUn6p3Q.__Eloe.S1M0xRrV8J1OHLvqqMZbw.fERtHlDnI_.2ZOEqi_w8rR389kh7mamD0olQLq6xRUvVd19v9_Hj5X8hZMBrMogStUN92Q9kps6s8lSf4l8OvFJQYbwRk1IHGuL19jNsSvzVi92zZyZuBNhR05vB_6S.t4YOyh3TuroxMwXjSFlB00BKOL3X5UcnrOZ6zPP16nqW_1uPPZkNt6zcj9ygpH6zS99k"
}]
Insert these capabilities in the scripts that need them, to using CAPADD function: "token" CAPADD. If you want to keep the 2.0 compatibility until the end of the migration, the best way is to test Warp 10 revision with the following code:
  '3' MINREV <%  // 2.x compatible code
    "JYGeKhcsad_nAEUn6p3Q.__Eloe.S1M0xRrV...k"
    'CAPADD' EVAL
  %> IFT
Capabilities within WarpScript handlers
If you are using HTTP plugin, TCP / UDP plugin, or MQTT plugin, you use handlers defined in WarpScript. STDOUT is very convenient to debug them. So you need to add the debug capability twice: at the beginning of the script, and in the handler macro. For example, I updated our connected Beertender MQTT handler:
//subscribe to the BeerTender topic, attach a warpscript macro callback to each message
// the macro read TheThingNetwork message to extract the payload and process it.
"J92zZyZuBNhR05vB_6S.t4YOyh.....3TuroxMwXjSFlMK91KOL3X5UcnrOZ6zPP16nqW_1uPPZkNt6zcj9ygpH6zS99k"
CAPADD
'Loading MQTT TTN BeerTender Warpscript' STDOUT
{
  'host' 'eu1.cloud.thethings.network'
  'port' 1883
  'user' 'beertender-senx@ttn'
  'password' 'pass'
  'clientid' 'Warp10'
  'topics' [
    'v3/beertender-senx@ttn/devices/+/up'
  ]
  'timeout' 20000
  'parallelism' 1
  'autoack' true

  'macro'
  <%
    //in case of rx timeout, the macro is called with NULL on the stack to flush buffers if any.
    'message' STORE

    <% $message ISNULL ! %>
    <%
      "J92zZyZuBNhR05vB_6S.t4YOyh.....3TuroxMwXjSFlMK91KOL3X5UcnrOZ6zPP16nqW_1uPPZkNt6zcj9ygpH6zS99k"
      CAPADD
      $message MQTTPAYLOAD 'ascii' BYTES-> 'payload' STORE
      $payload STDOUT

(...)
The handler is parsed once to extract the macro object, then the macro is executed several times on another new stack. The first capability defined outside the macro is lost in the process.
How to replace AUTHENTICATE
To replace the old AUTHENTICATE function, create a token with the limits capability:
'00000000-0000-0000-0000-000000000000' 'uuid' STORE
{
  'id' 'TokenRead'
  'type' 'READ'
  'application' 'noapp'
  'owner'  $uuid
  'issuance' 0
  'expiry' [ 2050 ] TSELEMENTS-> MSTU /
  'labels' { }
  'attributes' {
      '.cap:limits'    ''  // allow to raise all limits to hard limits. Same as effect as former AUTHENTICATE.
   }
  'owners' [ $uuid ]
  'producers' [ $uuid ]
  'applications' [ 'noapp' ]
} TOKENGEN

JSONPRETTY
The limits capability has exactly the same effect as former AUTHENTICATE function. You can raise limits up to the hard limits defined in your configuration.
You can update scripts with this code to ensure it works in both 2.x and 3.x:
'3' MINREV
<%
  'tokenWithLimitsCap' 'CAPADD' EVAL
%>
<%
  'existing token' 'AUTHENTICATE' EVAL
%> IFTE
Capabilities within Discovery dashboards
Just like handlers, discovery dashboards must use CAPADD in every macro (just as AUTHENTICATE). Each macro is executed in a separate context, so adding capabilities at the beginning of a dynamic dashboard has no effect.
Step 7: update and test WarpScripts
The audit tool will spot all possible problems, but you may need help. For our customers, we will be happy to help. For users, you can seek help on our Slack.
Look at Warp10 logs to see if there are WarpScript problems. If you followed the previous advice, you can still easily switch between v2.x and v3:
sudo systemctl stop warp10.service
/opt/warp10/bin/warp10.sh start

/opt/warp10/bin/warp10.sh stop
sudo systemctl start warp10.service
Step 8: change systemd unit
Now your migration is done and every WarpScript is working in v3, you can switch definitely to v3.
Update /opt/warp10/bin/warp10-3.x.service to fix the path:
sed -i -e "s/-@VERSION@//g" /opt/warp10/bin/warp10-3.x.service
Then, disable the previous service, and enable the new one. As root:
systemctl disable warp10.service
mv /opt/warp10/bin/warp10.service /opt/warp10/bin/warp10-2.x.service
mv /opt/warp10/bin/warp10-3.x.service /opt/warp10/bin/warp10.service
ln -s /opt/warp10/bin/warp10.service /etc/systemd/system/warp10.service
systemctl daemon-reload
systemctl enable warp10

/opt/warp10/bin/warp10.sh stop
systemctl start warp10
Check the systemd logs and make sure everything is fine:
# journalctl -f -u warp10.service
Conclusion
Most of the work will concern missing capabilities. This article explains how to generate and add them.
If you did unit tests in your macros, the effort will pay now.
If you find unexpected parsing or execution errors in Warp 10 v3.x, or if you need help during the transition process, contact us.
Read more
Introducing Warp 10 3.0!
Deploying a Distributed Warp 10 instance
June 2023: Warp 10 release 3.0.0

Electronics engineer, fond of computer science, embedded solution developer.